Teo Jun Jie - Project Portfolio
Overview
MakerManager is a free, open-source, desktop application for managing time-shared equipment in makerspaces. MakerManager aims to bridge a gap to let makers and managers coordinate effectively and efficiently - so you can worry less about availability and spend more time hacking! The app is meant for makers, and thus is optimized for people comfortable with a Command Line Interface (CLI). The project was developed by a team of 4, and you can find out more about the developers in the About Us section.
Features:
-
A GUI for displaying all available machines at a glance.+
-
Two different access levels, for two separate target profiles (see below)
-
Ability to manipulate prints, queues, and machines, depending on access level
-
More test cases, including automated GUI testing.
-
Support for Build Automation using Gradle and for Continuous Integration using Travis CI.
Target user profile:
There will be two categories of users for the app. The main user will be students using the makerspace. The second user will be the lab manager
-
has a need to manage a significant number shared devices (lab manager)
-
has a need to prioritize and queue certain print jobs over others (lab manager)
-
has a need to look up when certain devices will be free for use (students)
-
prefers typing over mouse input
-
is reasonably comfortable using CLI apps
Value proposition:
See which 3D printers are being used, and the estimated time left until the equipment will be free. This will reduce system loss and increase the efficiency of all parties involved.
Summary of contributions
-
Code contributed: [Functional code]
-
Major enhancements:
-
Added the feature to add a machine to makerManager systems
-
What it does: Allows an admin to add maker manager 3d printer to the system to allow maker manager uses to start using this printer to execute their print jobs.
-
Justification: This feature is significant because without this feature, no print jobs can be executed since no printers will be available for users to execute their print jobs.
-
Highlights: This enhancement affects existing commands and commands to be added in future. It required an in-depth analysis of design alternatives. The implementation too was challenging as it required changes to existing commands.
-
-
Added the feature to add a job to a machine to makerManager systems
-
What it does: Allows a user to add a print job to a maker manager 3d printer.
-
Justification: This feature is significant because without this feature, a user will not be able to add a print job to the system without this command
-
Highlights: This enhancement affects existing commands and commands to be added in future. It required an in-depth analysis of design alternatives. The implementation too was challenging as it required changes to existing commands.
-
Credits: Fu Tian Yuan wrote the code for version 1.0 of addJob, I integrated addJob into the makerManager system along with the storage and ui.
-
-
Added the feature to manage a machine to makerManager systems
-
What it does: Allows a user to manage a machine
-
Flush - Remove all jobs from a machine with AUTO feature (flush jobs to all available machines)
-
Clean - Remove all jobs that are of status CANCELLED, FINISHED, DELETING
-
Remove - Remove the machine from makerManager systems (only if the machine does not have any more jobs)
-
-
Justification: This feature is significant because without this feature, machines cannot be effectively managed. When makerManager becomes more intensively used in the future, there will be a lot of jobs in each machine in which some of this jobs may have already been completed , finished or deleting. This makes the UI clunky and unusable as users will not be able to find their jobs that they added to the system as it would be too messy. This feature enhances the user experience and improves the efficieny of the system.
-
Highlights: This enhancement affects existing commands and commands to be added in future. It required an in-depth analysis of design alternatives. The implementation too was challenging as it required changes to existing commands.
-
-
-
Minor enhancement:
-
Improved editMachine command and resolved the bugs that we had in V1.3
-
File-to-Memory transfer of data modifications for separate files
-
-
Other contributions:
-
Project management:
-
Managed releases
v1.3-v1.4(2 releases) on GitHub
-
-
Enhancements to existing features:
-
Enhanced manageJobs command by integrating code with UI
-
-
Documentation:
-
Community:
-
Tools:
-
Configured travis version 1.0 at the start of the project
-
-
Contributions to the User Guide
Given below are sections I contributed to the User Guide. They showcase my ability to write documentation targeting end-users. |
-
Add Machine (Admin Only)
Adds a new machine to MakerManager. You might be extending your printer fleet by adding new printers, and this lets the users of the space know. Especially handy if it’s a big place!
Outcome: You will see a new column added to the UI.This command has the following constraints:
-
All machine names must be unique.
-
Names should only contain alphanumeric characters and spaces, and it should not be blank.
-
Reserved names are :
AUTO
-
-
Status can only be
-
“ENABLED”
-
“DISABLED”
Format: <addMachine> n/MACHINE_NAME ms/STATUS
Example: addMachine n/myMachine ms/DISABLED
-
-
AddJob Version 1.2 and 1.3 (Integrated code with storage and UI)
-
Add a Print Job
Adds a print job to a machine’s queue in MakerManager.
Outcome: You will see the job in if you scroll down the queue of the machine you specified.
SpecifyingAUTOas MACHINE_NAME will let the software optimize which queue to add the print to.
Available priorities:URGENT,HIGH,NORMAL.
Please note thatPRIORITYis currently just a display feature aimed at helping the lab manager gain more information.Prints cannot be added to disabledMachines!
Multiple tags can be added to one print job.Format: addJob n/PRINT_NAME m/MACHINE_NAME on/OWNER_NAME pr/PRIORITY d/DURATION(in hours) jn/NOTE [t/TAG]...
Example: addJob n/iDCP m/UpBox on/TIAN YUAN pr/HIGH d/1.5 jn/This is for the iDCP project t/iDCP
-
Requests a print job to be deleted by admin
This command ensures that a malicious user cannot delete prints from a queue just so that (s)he can get the print done fast.
Outcome: Marks a print with arequestDeletiontag, after which the admin might decide to remove it.Format: requestDeletion n/PRINT_NAME
Example: requestDeletion n/gears
-
Manage machine (Admin only)
-
Clean a Machine
Cleans a machine by removing jobs that have statusCANCELLED,FINISHEDorDELETING. This is a convenient and fast way for you to get things done.
Outcome: The machine will no longer have any of these jobs listed afterwards, making it easier for others to view.Format: <manageMachine> MACHINE_NAME clean
Example: manageMachine Ultimaker clean
-
Flush a Machine
Removes all the jobs from the specified machine. You will be warned and asked for confirmation, as it may hinder other users.
Outcome: If you press OK, the machine’s queue will be empty. If you press CANCEL, nothing happens.
If you specify AUTO, the prints in the existing machine will be transferred to other machines optimally.Format: <manageMachine> MACHINE_NAME flush
Examples:
manageMachine oldupbox flush
manageMachine oldupbox flush AUTO
-
Remove a Machine
Removes a machine from MakerManager. This helps you decommission a machine and let users know instantly.
Outcome: You will no longer see the machine as a column in the UI.You can’t do this unless the machine’s queue is empty.
Format : <manageMachine> MACHINE_NAME remove
Example: manageMachine oldupbox remove
-
-
Finding Machines:
Finds machines based on given keywords. You have to give at least 1 argument.
Outcome: You will see only matching machines shown in the UI.After the filtered machine list is displayed, use the listMachinescommand to return to the main menu.
Format: findMachine [MACHINE_NAME_1] [MACHINE_NAME_2]...
Example: findMachine oldupbox mbot
ManageJob Version 1.3 (Integrated code with storage and UI)
-
Manage Print
-
Start a Print
Starts an existing print job, if it is at the top of the queue.
Outcome: The print tag will be set toONGOINGand the machine will start a timer. The print will be automatically flagged asFINISHEDafter the time specified in the duration has passed.
If you want to get an urgent print done, but it is not at the top of the queue, please request lab manager’s assistance.If adminmode is enabled, users are able to start jobs that are not at the top of the queueFormat: manageJob/<manageJob> PRINT_NAME start
Example: manageJob gears start
-
Cancel a Print
Cancels an existing print in the queue. You might want to use this if the print fails, which is very common for 3D printers, or if you no longer want to print for whatever reason.
Outcome: The print tag will be changed toCANCELLED.Format: manageJob PRINT_NAME cancel
Example: manageJob gears cancel
-
Restarting a Print: Restarts an existing print in the queue. Same as start. This is be used after a failed(cancelled) print.
Format: manageJob PRINT_NAME restart
Example: manageJob gears restart
-
Delete a Print (Admin only)
Deletes an existing print in the queue.
Outcome: You will no longer see the specified print in the UI.Format: <manageJob> PRINT_NAME delete
Example: manageJob gears delete
-
Move a Print (Admin only)
Moves an existing print that is notONGOINGto another machine. This command inserts the print at the bottom of the target Machine’s queue
Outcome: Print is removed from its current Machine and added to the bottom of the queue of the target Machine.Prints are always displayed sorted in order of ONGOING, followed byQUEUED, thenrequestDeletionorCANCELLEDorFINISHED.Format: <manageJob> PRINT_NAME move MACHINE_NAME
Example: manageJob gears move ultimaker
-
Shifting a Print (Admin only)
Shifts an existing print that is notONGOINGup or down in it’s queue.
Valid shift options are:-
up
-
down
Prints are always displayed sorted in order of ONGOING, followed byQUEUED, thenrequestDeletionorCANCELLEDorFINISHED.Format: <manageJob> PRINT_NAME shift SHIFT_OPTION
Example: manageJob chassis shift up
-
-
Swap a Print (Admin only)
Swaps an existing print with another existing print. Both Prints must not beONGOING.Prints are always displayed sorted in order of ONGOING, followed byQUEUED, thenrequestDeletionorCANCELLEDorFINISHED.Format: <manageJob> PRINT_NAME swap TARGET_PRINT_NAME
Example: manageJob gears swap cup
-
Contributions to the Developer Guide
Given below are sections I contributed to the Developer Guide. They showcase my ability to write technical documentation and the technical depth of my contributions to the project. |
Model component
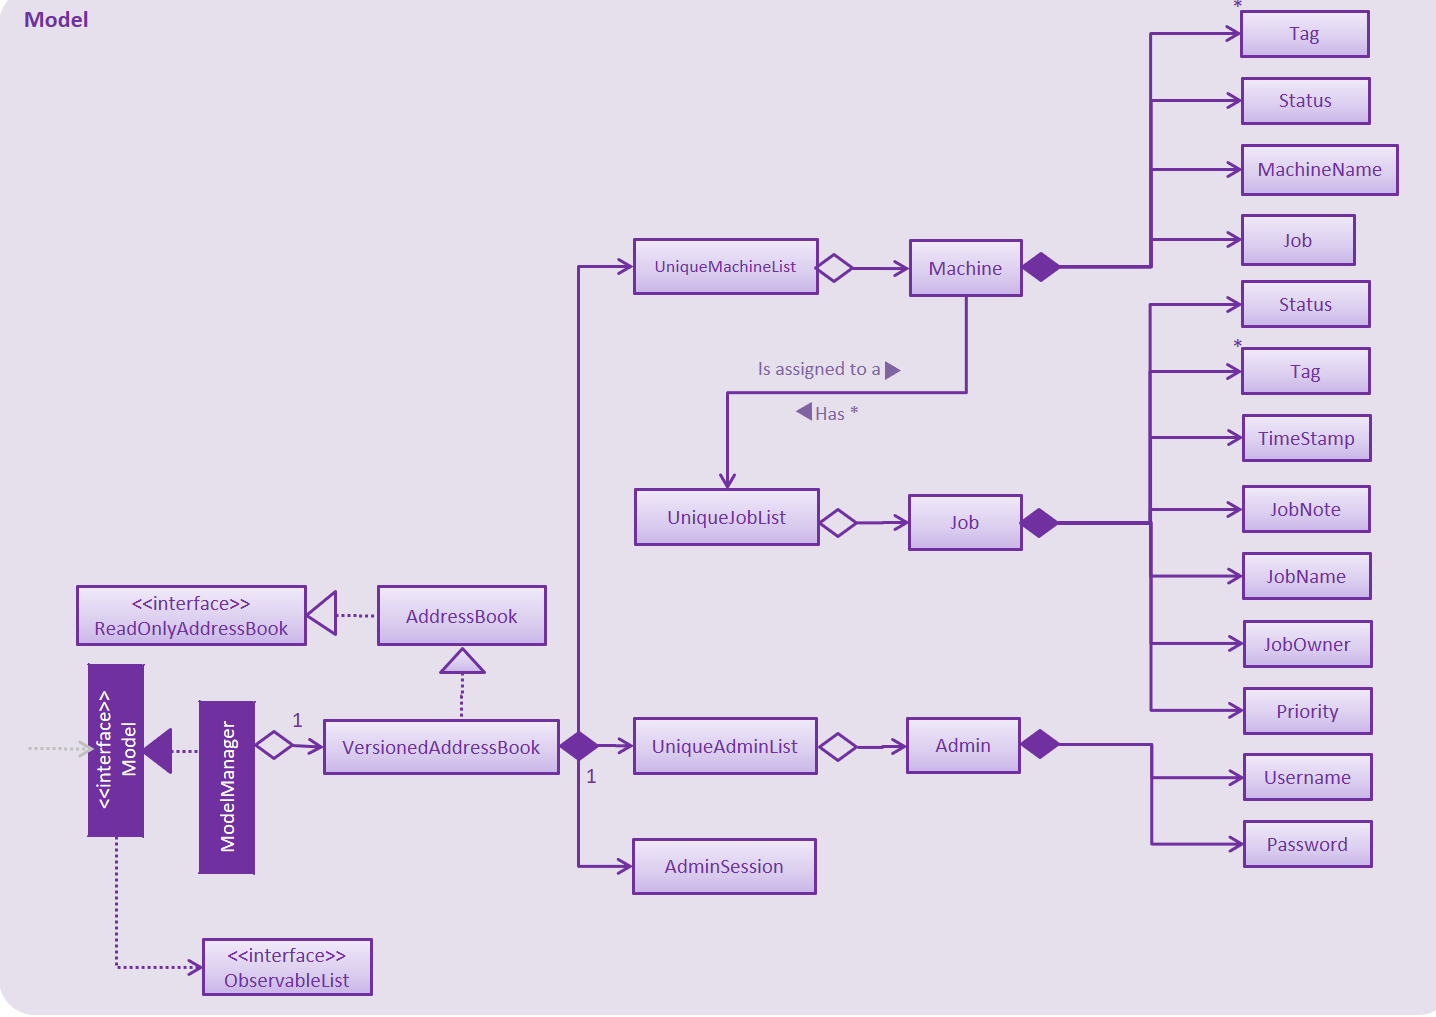
API : Model.java
The Model,
-
stores the Address Book data.
-
exposes an unmodifiable
ObservableList<Admin>that can be 'observed' -
exposes an unmodifiable
ObservableList<Job>that can be 'observed' in machines -
exposes an unmodifiable
ObservableList<Machine>that can be 'observed' -
eg. the UI can be bound to these 3 lists so that the UI automatically updates when the data in any of the list changes.
-
does not depend on any of the other three components.
Storage component
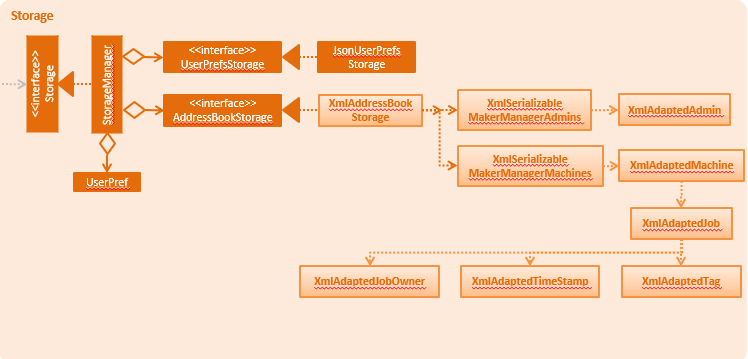
API : Storage.java
The Storage component,
-
stores an initialized
UserPrefobject that represents the user’s preferences derived from JsonUserPrefsStorage -
can save
UserPrefobjects in json format and read it back. -
can save the Address Book data in 2 separate xml format
-
XmlSerializableMakerManagerAdmins
-
XmlSerializableMakerManagerMachines
-
File Storage System for Maker Manager
This section will describe how Maker Manager reads and stores information in our local database in XML format.
The diagram below gives an overview on how Maker Manager stores its data.
The diagram below shows how Maker Manager reads its data upon start up.

-
When Maker Manager is booted, storageManager will execute readAddressBook(UserPrefs) where UserPrefs contains the file paths for each separate xml data file :
-
makerManagerMachines.xml
-
makerManagerAdmins.xml
-
-
XmlAddressBookStorage will then attempt to read each file path sequentially through XmlFileStorage. XmlFileStorage will then call a utility function from a class called XmlUtil which will load the appropriate data and its corresponding file format. It will then marshall the data into a java object of the format in which it was called with
-
It will then send this java object back to address book storage which will call the toModelType() function from each XmlSerializableClass back to storage manager as a new address book containing the respective data from the xml files in their correct maker manager java objects.(See [versionedaddressbook])