By: CS2113-AY1819S1-T09-1 Since: Sep 2018 Licence: MIT
Welcome to MakerManager Developer Guide! MakerManager is a free, open-source, desktop application for managing time-shared equipment in makerspaces. MakerManager aims to bridge a gap to let makers and managers coordinate effectively and efficiently - so you can worry less about availability and spend more time hacking! MakerManager is meant for makers, and thus is optimized for people comfortable with a Command Line Interface (CLI). Check out the User Guide to quickly see what MakerManager is capable of.
MakerManager is written in Java, under the Object-Oriented paradigm. There are lots of ways in which you can contribute to MakerManager: coding, testing, improving tools, or contributing to the documentation. This guide provides information that will help you get started in your intended direction, and we hope you’ll find it useful regardless of whether you’re a new software developer, or an experienced hand. Some preveious experience in software engineering in Java is assumed.
Choose a topic from the Table of Contents below, to get an in-depth description of the inner workings of the application.
1. Setting up
Follow the simple steps below to get up and running with the MakerManager application development process.
1.1. Prerequisites
You need to have the following software installed in your system before you can start the development process. Both the software might require sign-up procedures before you can download their installation file.
-
JDK
9or later
You can use this link to help you install JDK.JDK 10on Windows will fail to run tests in headless mode due to a JavaFX bug. Windows developers are highly recommended to use JDK9. -
IntelliJ IDE
You can use this link to help you install IntelliJ IDEA.IntelliJ by default has Gradle and JavaFx plugins installed.
Do not disable them. If you have disabled them, go toFile>Settings>Pluginsto re-enable them.
You now have the tools to dive into MakerManager’s source code.
1.2. Setting up the project in your computer
To help you get the project into the development environment properly.
-
Fork this repo, and clone the fork to your computer
-
Open IntelliJ (if you are not in the welcome screen, click
File>Close Projectto close the existing project dialog first) -
Set up the correct JDK version for Gradle
-
Click
Configure>Project Defaults>Project Structure -
Click
New…and find the directory of the JDK
-
-
Click
Import Project -
Locate the
build.gradlefile and select it. ClickOK -
Click
Open as Project -
Click
OKto accept the default settings -
Open a console and run the command
gradlew processResources(Mac/Linux:./gradlew processResources). It should finish with theBUILD SUCCESSFULmessage.
This will generate all resources required by the application and tests.
The build should end with a BUILD PASSED message.
1.3. Verifying the setup
If all is well, the following two steps should be trivial.
-
Run the
seedu.address.MainAppand try a few commands -
Run the tests to ensure they all pass.
1.4. Loading sample data (Recommended for first-timers)
-
Download
DemoDataV1.4.zip(You can find it in the root directory of the repository here) -
Unzip (using WinRar or 7Zip, for example) and keep the
datafolder inside in the same directory as the jar file. -
The 'data' file should contain the 3 files below:
-
data/addressBook.xml
-
data/makerManagerAdmins.xml
-
data/makerManagerMachines.xml
-
-
Restart MakerManager to see the sample data loaded.
1.5. Configurations to do before writing code
Before you start messing around with the source code, here are some tools you might want to set up in order to tactfully handle a medium-sized project such as this.
1.5.1. Configuring the coding style
This project follows oss-generic coding standards. IntelliJ’s default style is mostly compliant with ours but it uses a different import order from ours. To rectify,
-
Go to
File>Settings…(Windows/Linux), orIntelliJ IDEA>Preferences…(macOS) -
Select
Editor>Code Style>Java -
Click on the
Importstab to set the order-
For
Class count to use import with '*'andNames count to use static import with '*': Set to999to prevent IntelliJ from contracting the import statements -
For
Import Layout: The order isimport static all other imports,import java.*,import javax.*,import org.*,import com.*,import all other imports. Add a<blank line>between eachimport
-
Optionally, you can follow the UsingCheckstyle.adoc document to configure Intellij to check style-compliance as you write code.
1.5.2. Updating documentation to match your fork
After forking the repo, the documentation will still have the MakerManager branding and refer to our upstream repo.
If you plan to develop this fork as a separate product (i.e. instead of contributing to MakerManager), you should do the following:
-
Configure the site-wide documentation settings in
build.gradle, such as thesite-name, to suit your own project. -
Replace the URL in the attribute
repoURLinDeveloperGuide.adocandUserGuide.adocwith the URL of your fork.
1.5.3. Setting up CI
Set up Travis to perform Continuous Integration (CI) for your fork. See UsingTravis.adoc to learn how to set it up.
After setting up Travis, you can optionally set up coverage reporting for your team fork (see UsingCoveralls.adoc).
| Coverage reporting could be useful for a team repository that hosts the final version but it is not that useful for your personal fork. |
Optionally, you can set up AppVeyor as a second CI (see UsingAppVeyor.adoc).
| Having both Travis and AppVeyor ensures your App works on both Unix-based platforms and Windows-based platforms (Travis is Unix-based and AppVeyor is Windows-based) |
1.5.4. Getting started with coding
When you are ready to start coding,
-
Get some sense of the overall design by reading Section 2.1, “Architecture”.
-
Take a look at [GetStartedProgramming].
2. Design
This section gives you a brief overview of the design of the app, including a look at the architecture and various other components. After reading this section, you should be able to understand some of the design trade-offs made during the development of the application.
2.1. Architecture
This section is designed to illustrate and identify the abstracted view of the architecture used to implement MakerManager. This section also contains descriptions of the separate components and process view of the communication between said components.
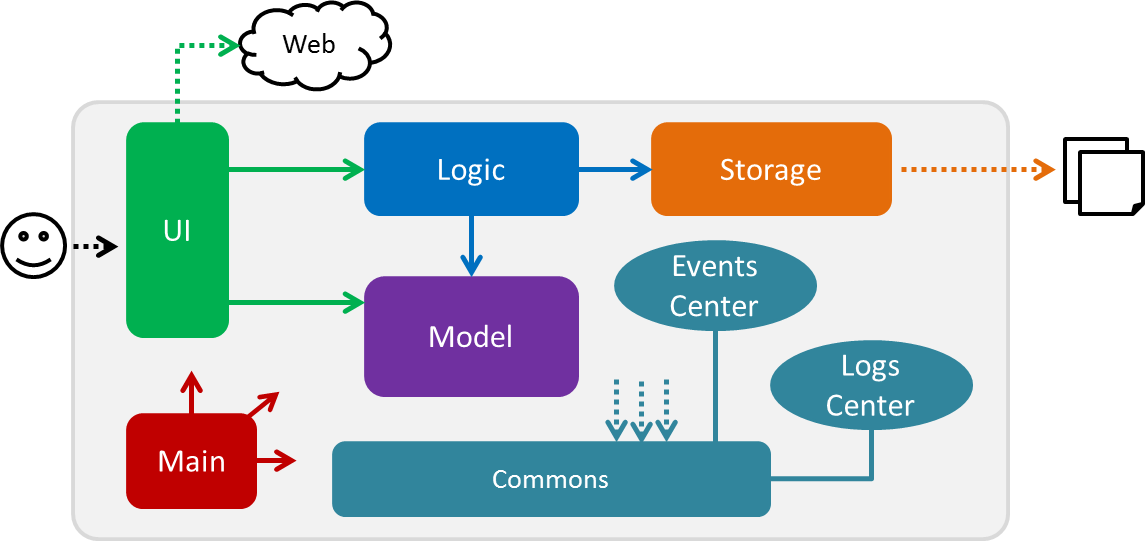
The Architecture Diagram given above explains the high-level design of the App. The Architecture system for the MakerManager is Event-driven Given below is a quick overview of each component.
The .pptx files used to create diagrams in this document can be found in the diagrams folder. To update a diagram, modify the diagram in the pptx file, select the objects of the diagram, and choose Save as picture.
|
Main has only one class called MainApp. It is responsible for,
-
At app launch: Initializes the components in the correct sequence, and connects them up with each other.
-
At shut down: Shuts down the components and invokes cleanup method where necessary.
Commons represents a collection of classes used by multiple other components. Two of those classes play important roles at the architecture level.
-
EventsCenter: This class (written using Google’s Event Bus library) is used by components to communicate with other components using events (i.e. a form of Event Driven design) -
LogsCenter: Used by many classes to write log messages to the App’s log file.
The rest of the App consists of four components.
-
UI: The User Interface (UI) of the application is what the user sees and interacts with. -
Logic: The command executor is the main driver of the program. It handles user input and reacts to them as needed. -
Model: The Model holds the data of the Application in-memory. This is the central repository for all data. -
Storage: The Storage component reads data from, and writes data to, the non-volatile memory. This ensures our data is saved between sessions.
Each of the four components
-
Defines its API in an
interfacewith the same name as the Component. -
Exposes its functionality using a
{Component Name}Managerclass.
For example, the Logic component (see the class diagram given below) defines it’s API in the Logic.java interface and exposes its functionality using the LogicManager.java class.
Events-Driven nature of the design
The Sequence Diagram below shows how the components interact for the scenario where the user issues the command addMachine n/ultimaker ms/ENABLED.
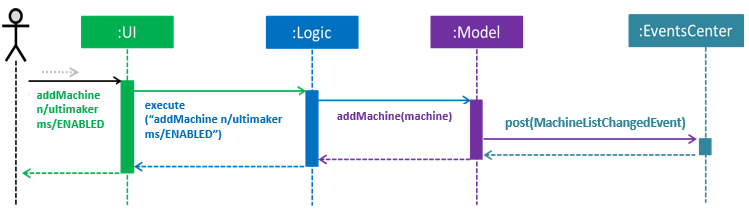
addMachine n/ultimaker ms/ENABLED command (part 1)
Note how the Model simply raises a MachineListChangedEvent when the maker manager data is changed, instead of asking the Storage to save the updates to the hard disk.
|
The diagram below shows how the EventsCenter reacts to that event, which eventually results in the updates being saved to the hard disk and the status bar of the UI being updated to reflect the 'Last Updated' time.
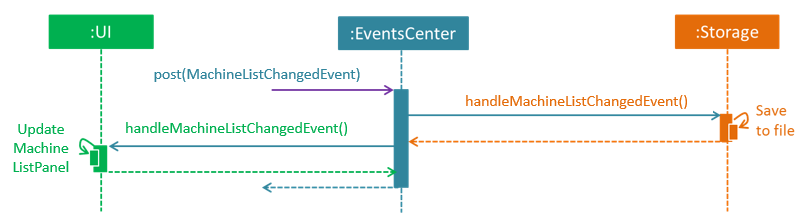
addMachine n/ultimaker ms/ENABLED command (part 2)
Note how the event is propagated through the EventsCenter to the Storage and UI without Model having to be coupled to either of them. This is an example of how this Event Driven approach helps us reduce direct coupling between components.
|
The sections below give more details of each component.
2.2. UI component

API : Ui.java
The UI consists of a MainWindow that is made up of parts e.g.CommandBox, ResultDisplay, MachineListPanel, StatusBarFooter etc. All these, including the MainWindow, inherit from the abstract UiPart class.
The UI component uses JavaFx UI framework. The layout of these UI parts are defined in matching .fxml files that are in the src/main/resources/view folder. For example, the layout of the MainWindow is specified in MainWindow.fxml
The UI component,
-
Executes user commands using the
Logiccomponent. -
Binds itself to some data in the
Modelso that the UI can auto-update when data in theModelchange. -
Responds to events raised from various parts of the App and updates the UI accordingly.
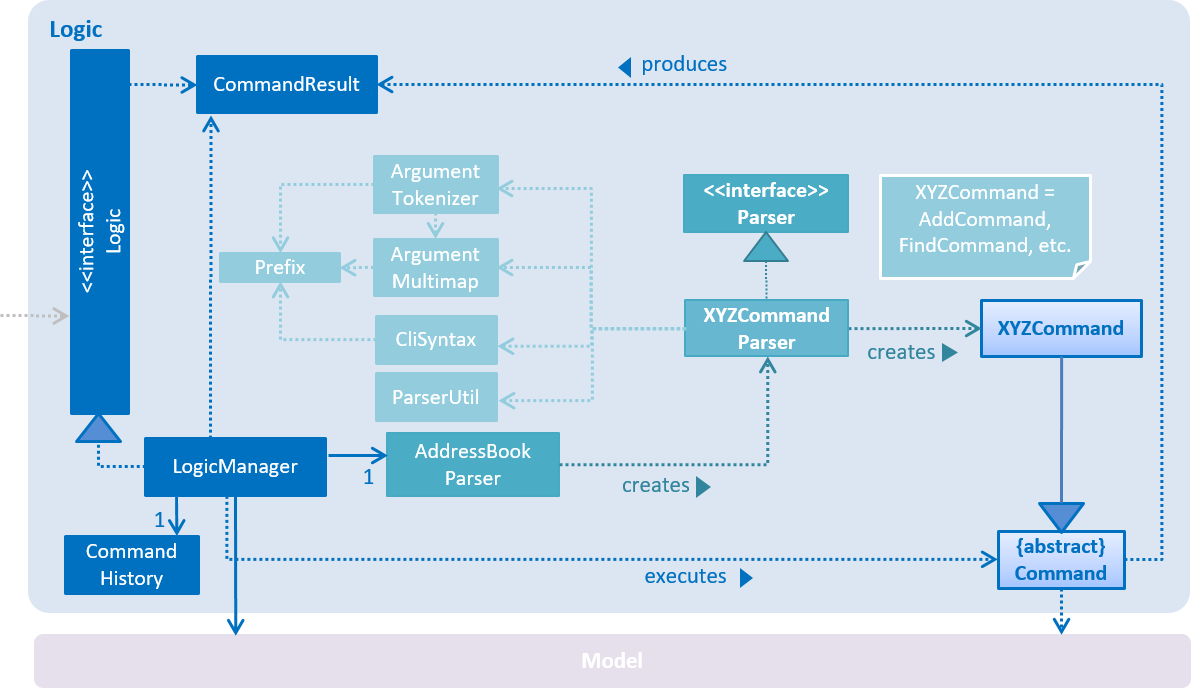
2.3. Logic component
API :
Logic.java
-
Logicuses theAddressBookParserclass to parse the user command. -
This results in a
Commandobject which is executed by theLogicManager. -
The command execution can affect the
Model(e.g. adding a machine) and/or raise events. -
The result of the command execution is encapsulated as a
CommandResultobject which is passed back to theUi.
Given below is the Sequence Diagram for interactions within the Logic component for the execute("addMachine ms/ultimaker n/ENABLED") API call.
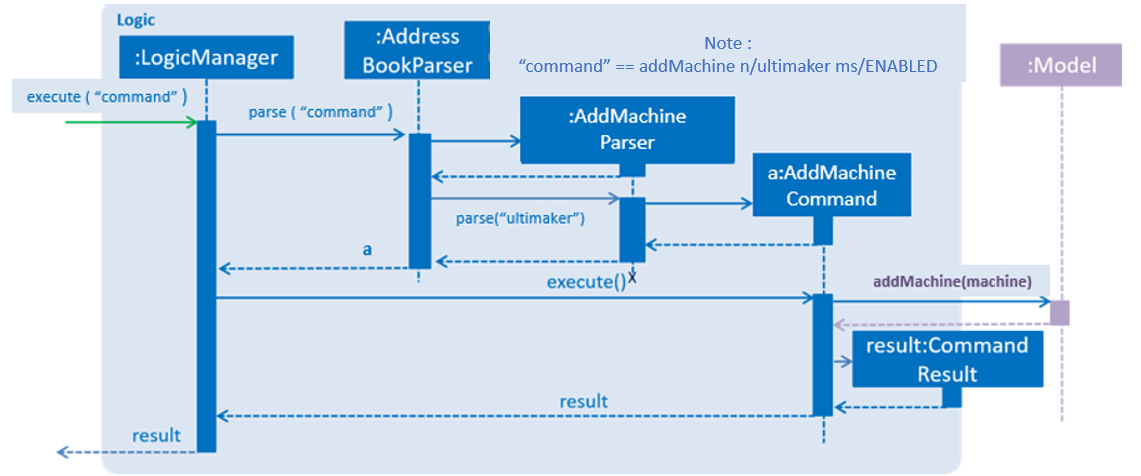
addMachine n/ultimaker ms/ENABLED Command2.4. Model component
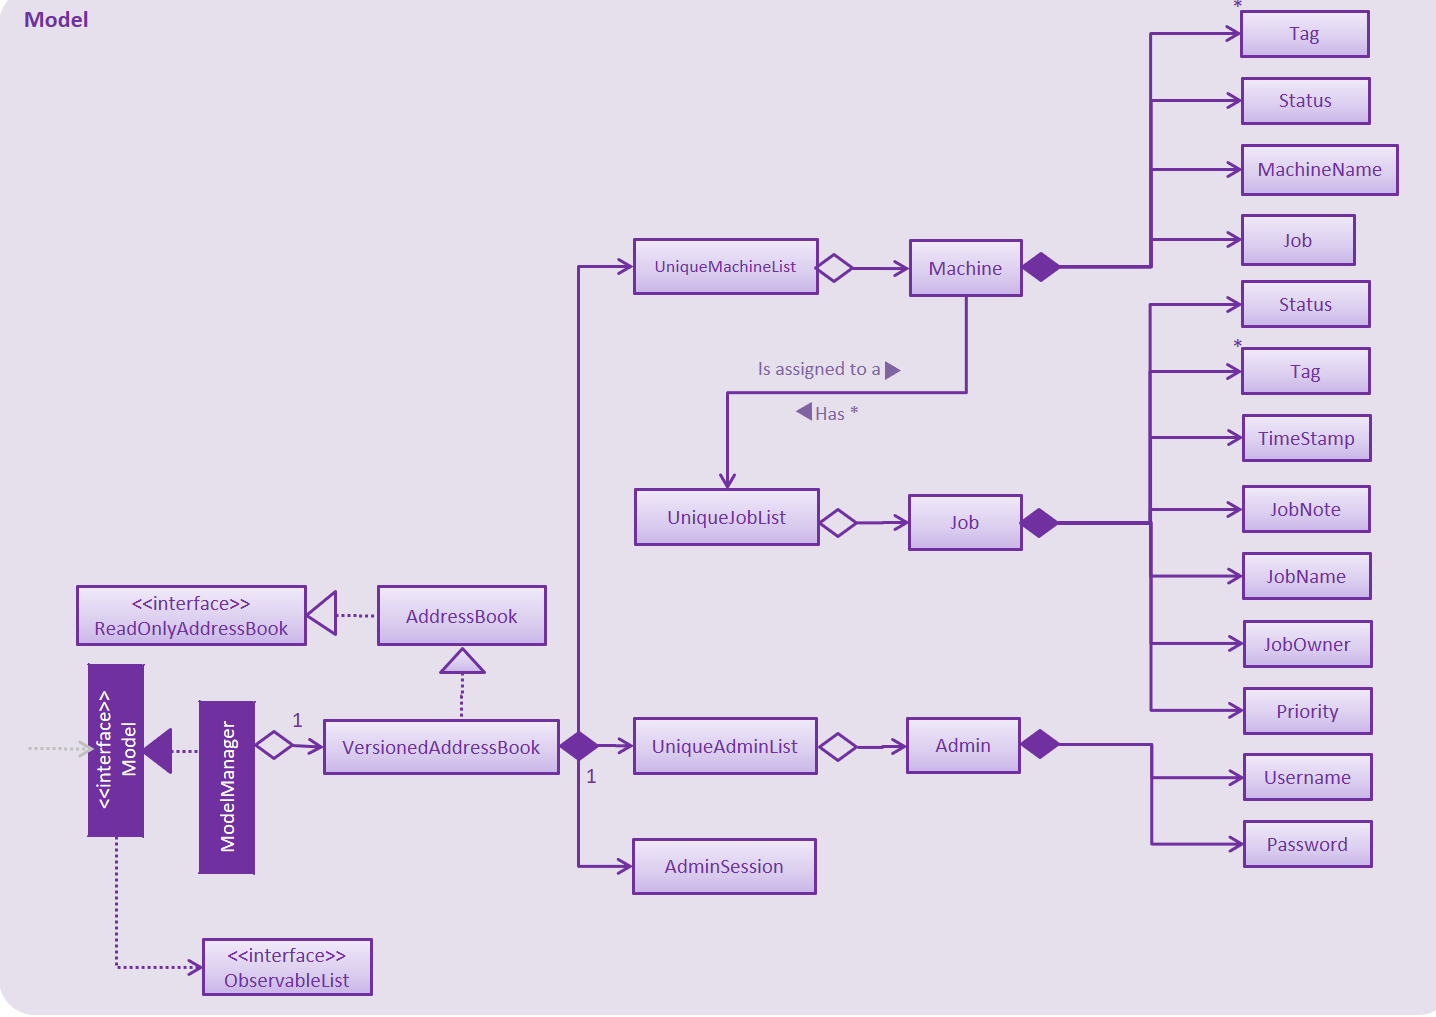
API : Model.java
The Model,
-
stores the Address Book data.
-
exposes an unmodifiable
ObservableList<Admin>that can be 'observed' -
exposes an unmodifiable
ObservableList<Job>that can be 'observed' in machines -
exposes an unmodifiable
ObservableList<Machine>that can be 'observed' -
eg. the UI can be bound to these 3 lists so that the UI automatically updates when the data in any of the list changes.
-
does not depend on any of the other three components.
2.5. Storage component
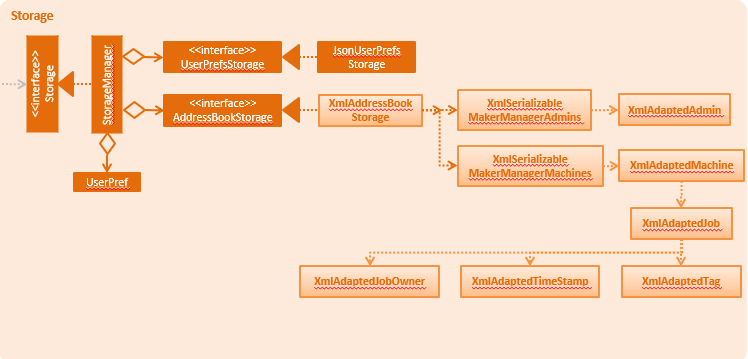
API : Storage.java
The Storage component,
-
stores an initialized
UserPrefobject that represents the user’s preferences derived from JsonUserPrefsStorage -
can save
UserPrefobjects in json format and read it back. -
can save the Address Book data in 2 separate xml format
-
XmlSerializableMakerManagerAdmins
-
XmlSerializableMakerManagerMachines
-
2.6. Common classes
Classes used by multiple components are in the seedu.addressbook.commons package.
3. Implementation
This section describes some noteworthy details on how certain features are implemented.
3.1. Undo/Redo feature
This section describes how undo/redo is implemented in MakerManager.
3.1.1. Current Implementation
The undo/redo mechanism is facilitated by VersionedAddressBook.
It extends AddressBook with an undo/redo history, stored internally as an addressBookStateList and currentStatePointer.
For added security, VersionedAddressBook also remembers the last time the user was logged in or logged out using lastAdminLoginPointer and lastAdminLogoutPointer .
Additionally, it implements the following operations:
-
VersionedAddressBook#commit()— Saves the current address book state in its history. -
VersionedAddressBook#adminLoginCommit()— Saves the current address book state in its history, updates lastAdminLoginPointer. -
VersionedAddressBook#adminLogoutCommit()— Saves the current address book state in its history, updates lastAdminLogoutPointer. -
VersionedAddressBook#undo()— Restores the previous address book state from its history. -
VersionedAddressBook#redo()— Restores a previously undone address book state from its history.
These operations are exposed in the Model interface as Model#commitAddressBook(), Model#undoAddressBook() and Model#redoAddressBook() respectively.
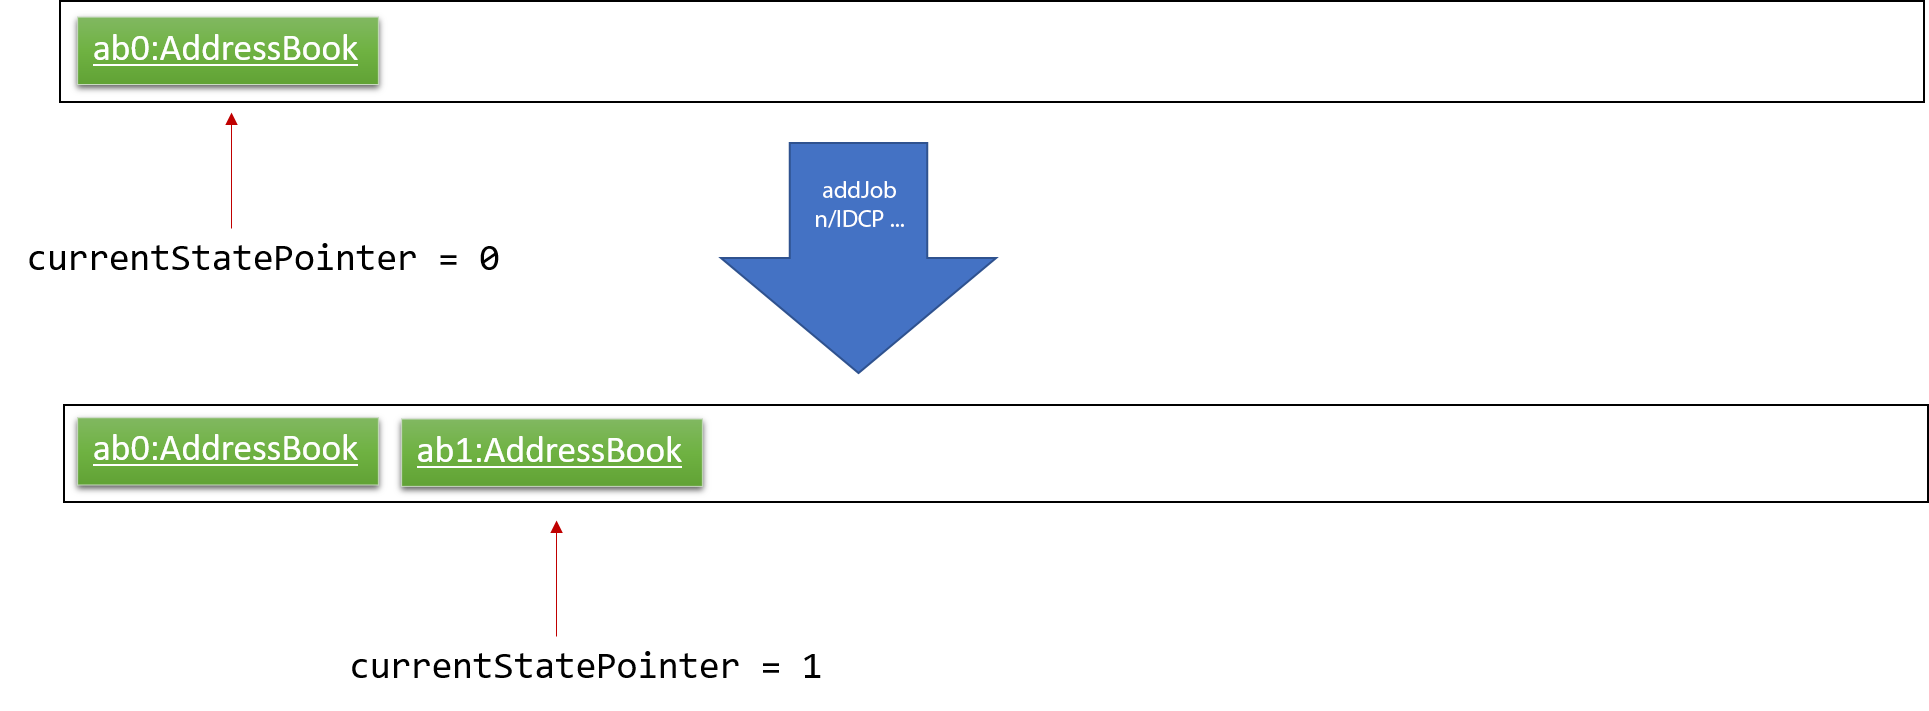
Given below is an example usage scenario and how the undo/redo mechanism behaves at each step.
Step 1. The user launches the application for the first time. The VersionedAddressBook will be initialized with the initial address book state, and the currentStatePointer pointing to that single address book state.
lastAdminLoginPointer and lastAdminLogoutPointer are initialised at -1, indicating that the MakerManager was never logged in or logged out.

Step 2. The user executes addJob n/iDCP.. command to add a Job to the MakerManager.
The addJob command calls Model#commitAddressBook(), causing the modified state of the address book after the addJob n/iDCP.. command executes to be saved in the addressBookStateList, and the currentStatePointer is shifted to the newly inserted address book state.
If the command used was login or logout, the corresponding Model#adminLoginCommitAddressBook() or Model#adminLogoutCommitAddressBook() will be called. This command additionally updates the corresponding
lastAdminLoginPointer or lastAdminLogoutPointer to the current address book state.
|
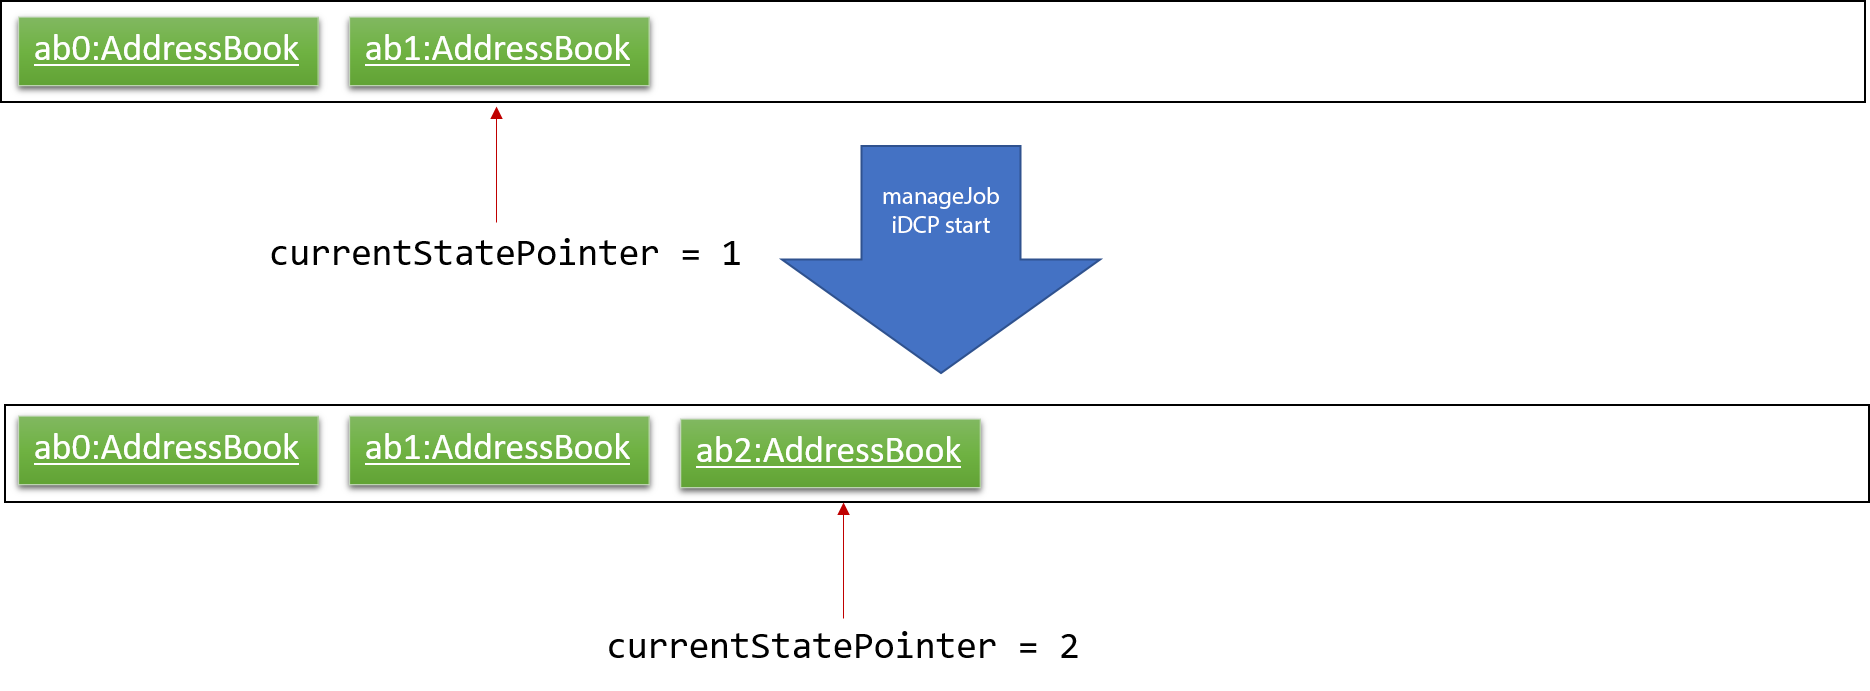
Step 3. The user executes manageJob iDCP start to start the job iDCP. The manageJob iDCP start command also calls Model#commitAddressBook(), causing another modified address book state to be saved into the addressBookStateList.
If a command fails its execution, it will not call Model#commitAddressBook(), so the address book state will not be saved into the addressBookStateList.
|
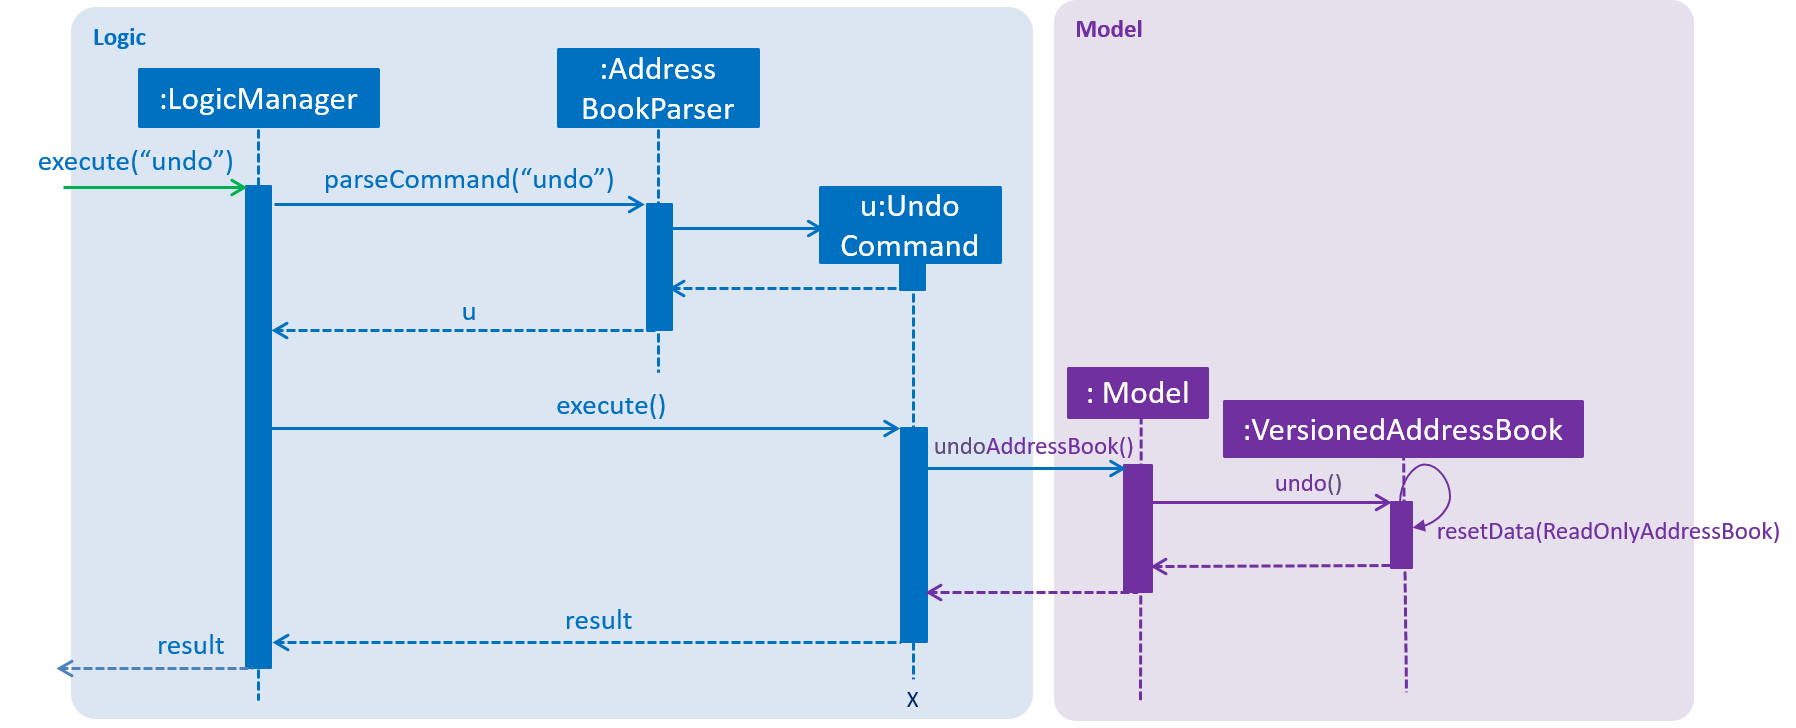
Step 4. The user now decides that starting the job was a mistake, and decides to undo that action by executing the undo command. The undo command will call Model#undoAddressBook(), which will shift the currentStatePointer once to the left, pointing it to the previous address book state, and restores the address book to that state.

If the currentStatePointer is at index 0, pointing to the initial address book state, then there are no previous address book states to restore. The undo command uses Model#canUndoAddressBook() to check if this is the case. If so, it will return an error to the user rather than attempting to perform the undo.
The undo command also checks if the user is attempting to undo a logout command by calling Model#isUndoLogout() and will return an error if this is the case.
|
The following sequence diagram shows how the undo operation works:
The redo command does the opposite — it calls Model#redoAddressBook(), which shifts the currentStatePointer once to the right, pointing to the previously undone state, and restores the address book to that state.
If the currentStatePointer is at index addressBookStateList.size() - 1, pointing to the latest address book state, then there are no undone address book states to restore. The redo command uses Model#canRedoAddressBook() to check if this is the case. If so, it will return an error to the user rather than attempting to perform the redo.
The redo command also checks if the user is attempting to redo a login command by calling Model#isRedoLogin() and will return an error if this is the case.
|
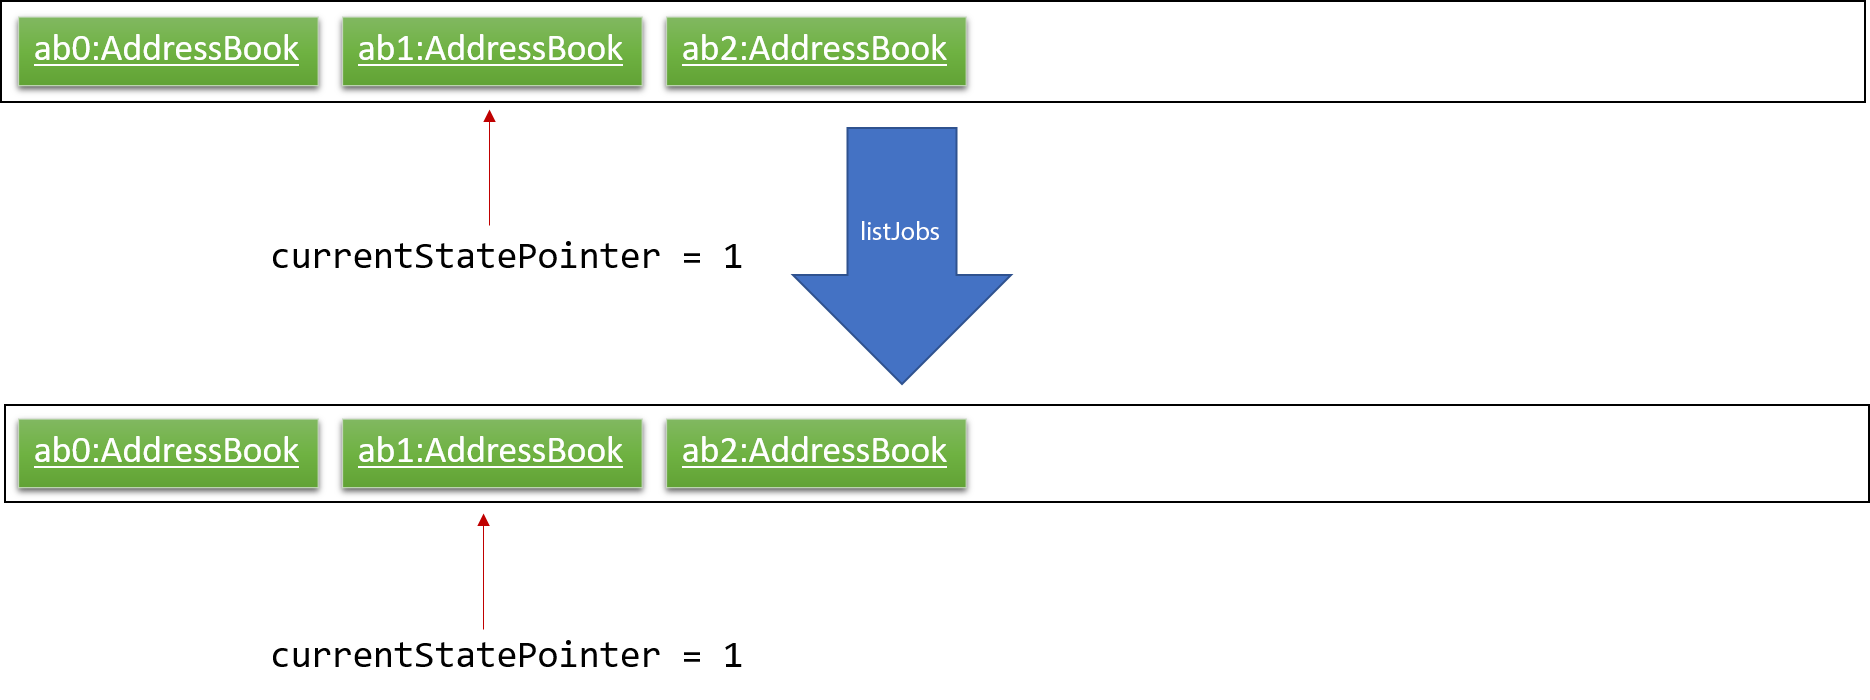
Step 5. The user then decides to execute the command listJobs. Commands that do not modify the address book, such as listJobs, will usually not call Model#commitAddressBook(), Model#undoAddressBook() or Model#redoAddressBook(). Thus, the addressBookStateList remains unchanged.
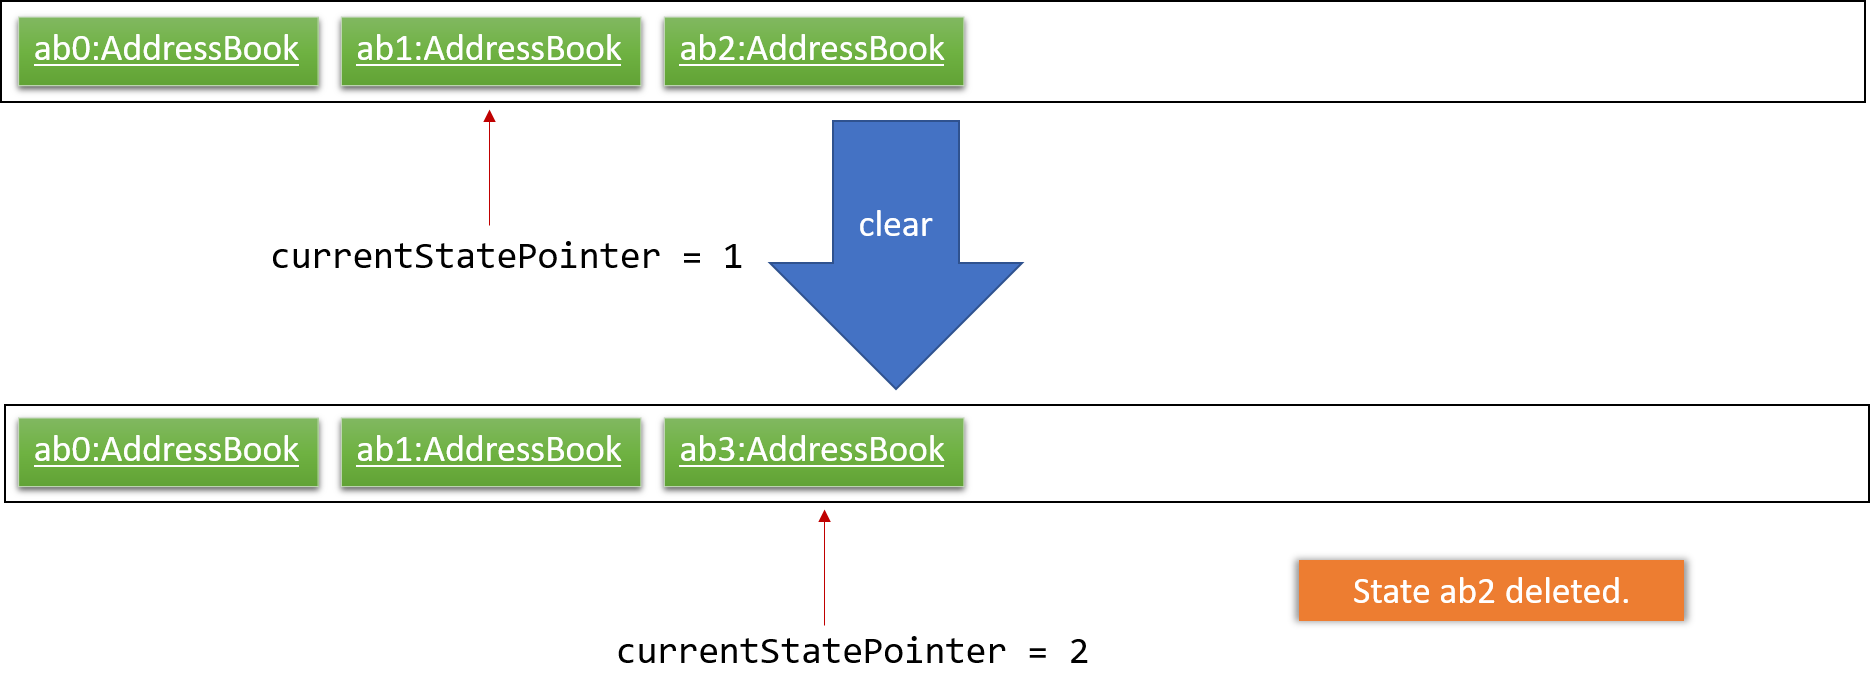
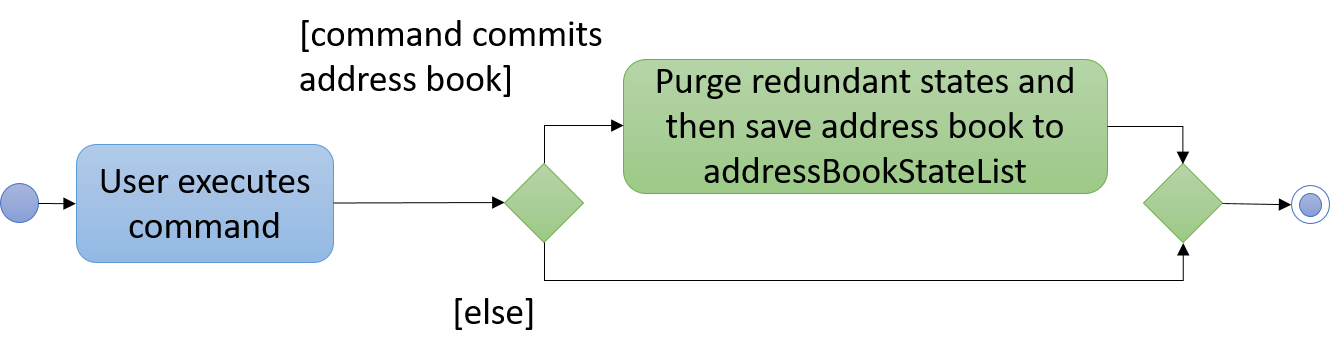
Step 6. The user executes clear, which calls Model#commitAddressBook().
Since the currentStatePointer is not pointing at the end of the addressBookStateList,
all address book states after the currentStatePointer will be purged. We designed it this way because
it no longer makes sense to redo the manageJob iDCP start command. This is the behavior that most modern
desktop applications follow.
The following activity diagram summarizes what happens when a user executes a new command:
3.1.2. Design Considerations
Aspect: How undo & redo executes
-
Alternative 1 (current choice): Saves the entire address book.
-
Pros: Easy to implement.
-
Cons: May have performance issues in terms of memory usage.
-
-
Alternative 2: Individual command knows how to undo/redo by itself.
-
Pros: Will use less memory (e.g. for
delete, just save the person being deleted). -
Cons: We must ensure that the implementation of each individual command are correct.
-
Aspect: Data structure to support the undo/redo commands
-
Alternative 1 (current choice): Use a list to store the history of address book states.
-
Pros: Easy for new Computer Science student undergraduates to understand, who are likely to be the new incoming developers of our project.
-
Cons: Logic is duplicated twice. For example, when a new command is executed, we must remember to update both
HistoryManagerandVersionedAddressBook.
-
-
Alternative 2: Use
HistoryManagerfor undo/redo-
Pros: We do not need to maintain a separate list, and just reuse what is already in the codebase.
-
Cons: Requires dealing with commands that have already been undone: We must remember to skip these commands. Violates Single Responsibility Principle and Separation of Concerns as
HistoryManagernow needs to do two different things.
-
3.2. File Storage System for Maker Manager
This section will describe how Maker Manager reads and stores information in our local database in XML format.
The diagram below gives an overview on how Maker Manager stores its data.
The diagram below shows how Maker Manager reads its data upon start up.

-
When Maker Manager is booted, storageManager will execute readAddressBook(UserPrefs) where UserPrefs contains the file paths for each separate xml data file :
-
makerManagerMachines.xml
-
makerManagerAdmins.xml
-
-
XmlAddressBookStorage will then attempt to read each file path sequentially through XmlFileStorage. XmlFileStorage will then call a utility function from a class called XmlUtil which will load the appropriate data and its corresponding file format. It will then marshall the data into a java object of the format in which it was called with
-
It will then send this java object back to address book storage which will call the toModelType() function from each XmlSerializableClass back to storage manager as a new address book containing the respective data from the xml files in their correct maker manager java objects.(See [versionedaddressbook])
3.3. Administrator Mode
This section describes how MakerManager builds a layer of security around critical data and restricts manipulation of such sensitive information to respective administrators/managers of individual makerspaces.
3.3.1. Current Implementation
The implementation of the administrator mode spans mainly the Logic and Model components, but also relies on the Storage component.
For better User-Experience, we also make small changes to Events and UI components in the architecture.
The following commands are directly related to admins: login, logout, addAdmin, removeAdmin and updatePassword
Our admin mode accommodates multiple admins, and ensures that there is at least one admin present.
The admins are stored in a UniqueAdminList() in versionedAddressBook, with their usernames and passwords being
securely stored in-Memory and in-file (for persistence).
See File Storage section for relevant storage part, Model Component for Admin class model and the Password Encryption
section for the discussion pertaining to the encryption.
|
The two different access types are implemented with the help of an AdminSession object inside versionedAddressBook. This Object keeps track of whether someone is logged in, and if so, who is. The AdminSession object has the following methods for us to use:
-
setLogin() - gives admin privileges to the current user
-
clearLogin() - strips admin privileges of the current user
-
isAdminLoggedIn() - returns a boolean saying whether we are in admin mode
-
getLoggedInAdmin() - returns reference to the admin currently logged in
The diagram below shows the admin-related section of the Model.

The following sequence diagram for login also applies to logout. We include this because it demonstrates how AdminSessions is used as well.
The diagram below illustrates the sequence diagram for login.
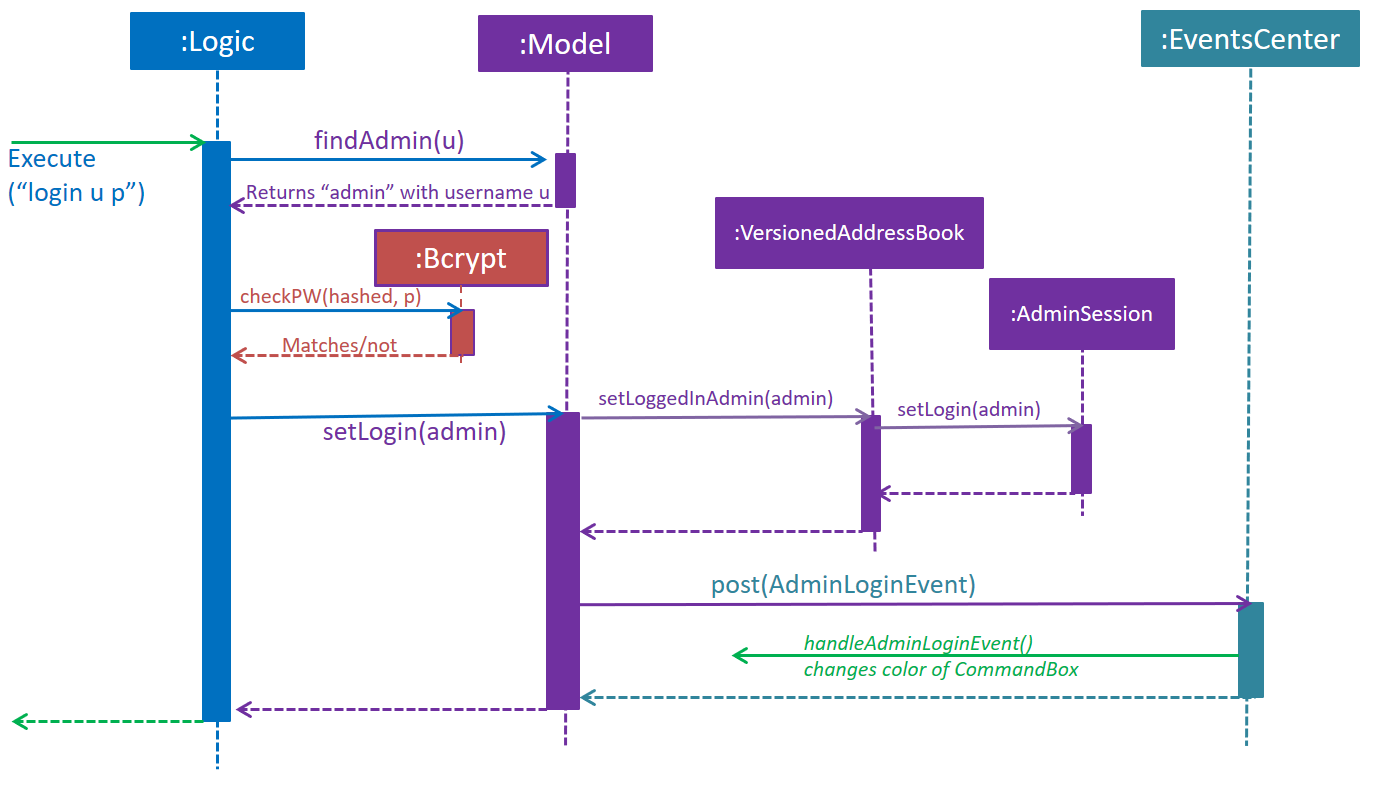
We can then use AdminSession to know whether an admin is logged in, before authorizing use of a command.
The simple activity diagram below demonstrates a common use case.

3.3.2. Design Consideration
The team debated on whether we should use a Singleton or not. We later decided not to use a Singleton since: . Singletons increase coupling . The system and the tests were already implemented without a singleton, and changing did not give any major pros.
3.4. Password Encryption
This section describes how MakerManager makes sure the administrator passwords are kept secure.
3.4.1. Current Implementation
The password is encrypted using salting and hashing. The low-level implementation of this is handled by the popular open source library jBcrypt. The library was chosen for having a fairly simple API for generating hashes and comparing passwords to stored hashes. The only two static methods used from the API were:
-
Bcrypt.hashPW() - generates an encrypted string from the raw text password
-
Bcrypt.checkPW() - verifies given password with stored hash
Other than this, we also enforce password validation to make sure a moderately strong password is chosen by the admin when signing up.
The implementation restricts itself to the Logic component of the architecture.
3.4.2. Design Considerations
Aspect: Where to encrypt
-
Alternative 1 (current choice): Encrypt it as it is being added to in-Memory address book.
-
Pros: Hashing needs to be done only once, after going through ModelManager. Storage Manager does not change. Able to do password validation and prevent unnecessary computations.
-
Cons: The password information is unprotected as it passes through UI and Logic.
-
-
Alternative 2: Encrypt it in UI
-
Pros: More secure transfer of passwords through the pipeline.
-
Cons: UI is heavy, and may become slower if hashing is too taxing on the system.
-
3.5. Managing Prints
This section describes how MakerManager manages the Jobs or Prints within the makerspace. More specifically, this section will detail the implementation of the manageJob command and its various sub-features.
The main command to manage and manipulate the Jobs in the makerManager
is manageJob which has the following subcommands:
-
start- sets the status of a job to "ONGOING" -
restart- sets the status of a job to "ONGOING", functionally the same as start, but used for restarting cancelled Jobs. -
cancel- sets the status of a job to "CANCELLED" -
remove- removes the Job from the Maker Manager -
swap- Swaps the position of two Jobs -
move- Moves a Job to another Machine -
shift- Shift a Job’s order within a machine
The syntax for the commands are implemented in the following manner:
manageJob <Jobname> subcommand <operand2>
The subcommands start, restart and cancel do not make use of <operand2>, whereas the subcommands
swap move and shift require
require <operand2> to specify target Job for swap, Machine for move, and up/down for shift.
We have nested these commands as subcommands of manageJob to centralise the management of Jobs for users, therefore making it
easier for users to manipulate Jobs.
3.5.1. Current Implementation
Our MakerManager keeps a record of all Jobs or Prints in a makerspace distributed across many machines.
Within each Machine, Jobs are stored within a uniqueJobsList. The Machines are in turn stored in a
UniqueMachineList in the VersionedAddressBook. The manipulation of the order and the content of the is facilitated by the ModelManager, which exposes the methods
implemented by the VersionedAddressBook.
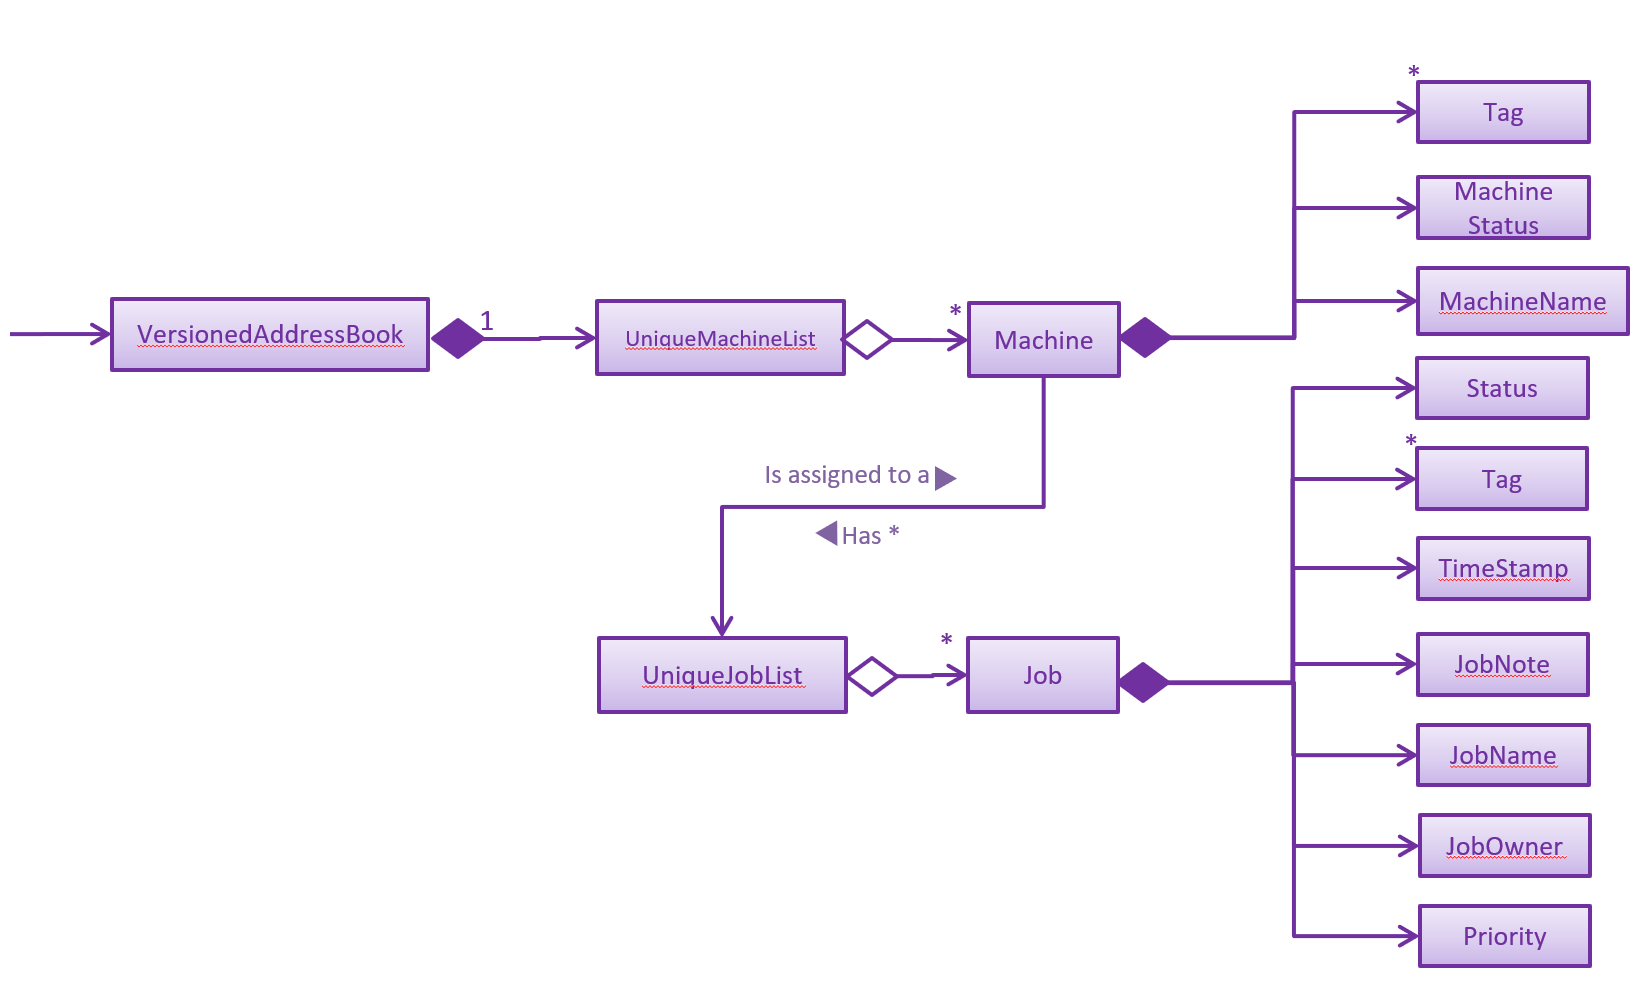
The diagram below shows the Jobs related section of the Model.
There are three main types of methods in VersionedAddressBook that concern
the manipulation of Jobs:
-
Lookup Methods that return a handle to a Job or Machine:
-
findJob()
-
findMachine()
-
These Methods are used to obtain a handle a particular Job or Machine using each’s classes name property. All Jobs
must have a unique name, and all Machines must also have a unique name. findJob() returns both a Job and its parent
Machine as a JobMachineTuple, a utility class container object that contains a Job and a Machine.
-
Methods that mutate Jobs:
-
startJob()
-
cancelJob()
-
restartJob()
-
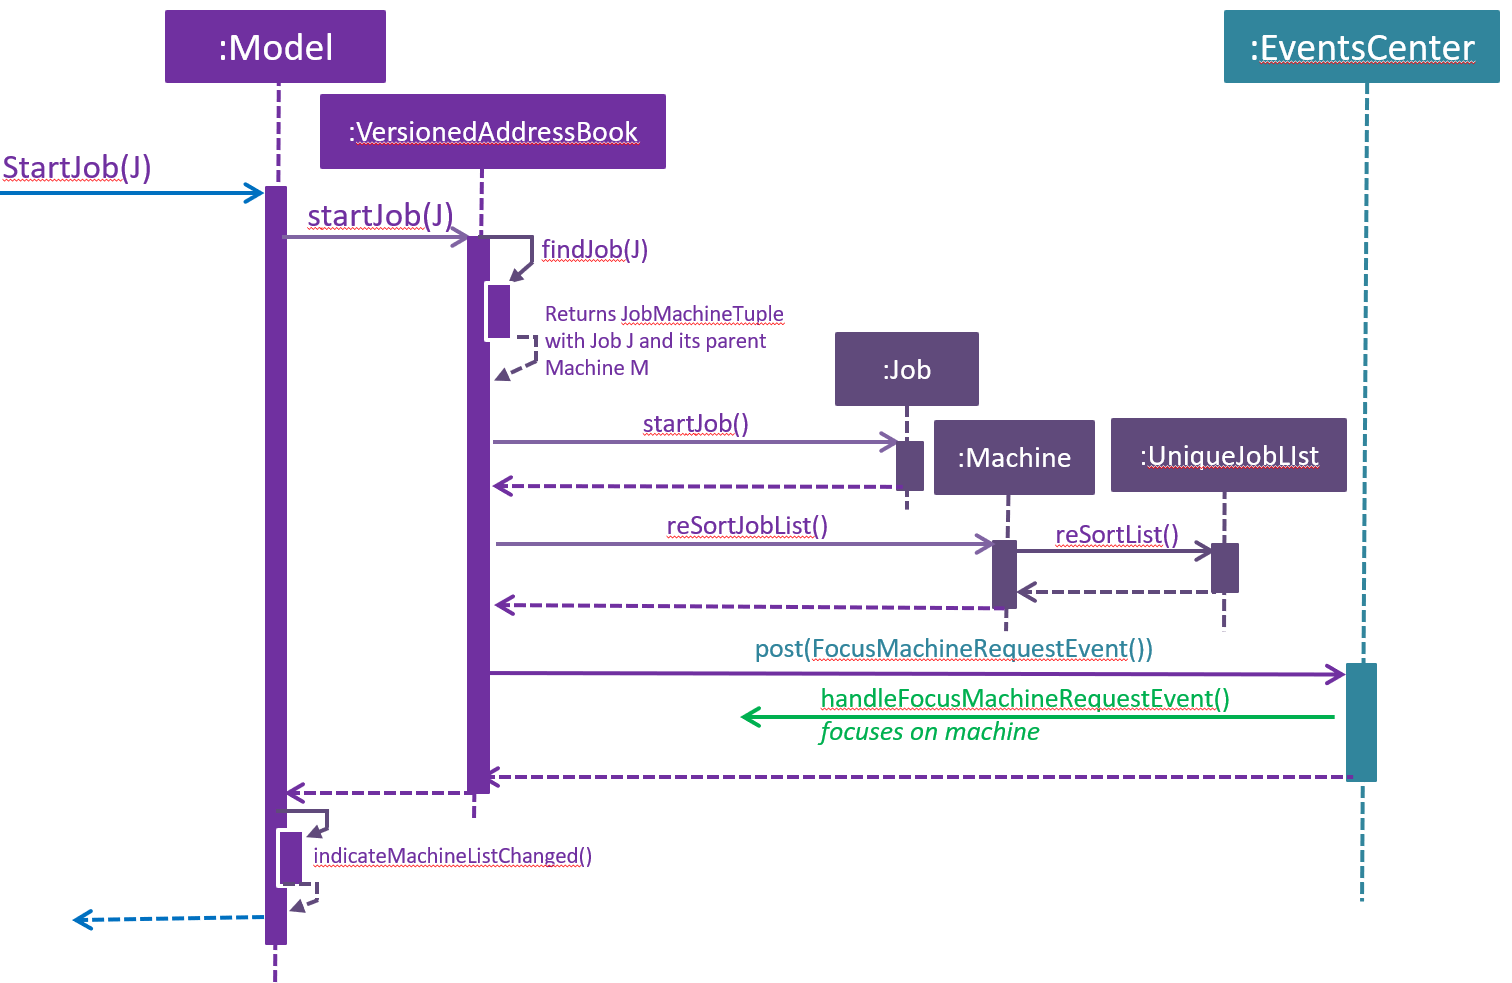
The sequence diagram for these methods are very similar, they follow a similar pathway and mutate the same property in Job. We will therefore only detail the sequence diagram of startJob().
The following diagram shows the sequence diagram for startJob().
-
Methods that mutates the UniqueJobList within a Machine:
-
swapJobs()
-
moveJob()
-
shiftJob()
-
Much like before, the sequence diagram for these methods are very similar, but will call methods from the UniqueJobsList as well.
Therefore, we can use the manageJob command to manipulate the prints Jobs to achieve a representation of the actual prints in the makerspace. This can be illustrated in the simple activity Diagram below.
The following diagram shows the generic activity diagram for a managing a Job.
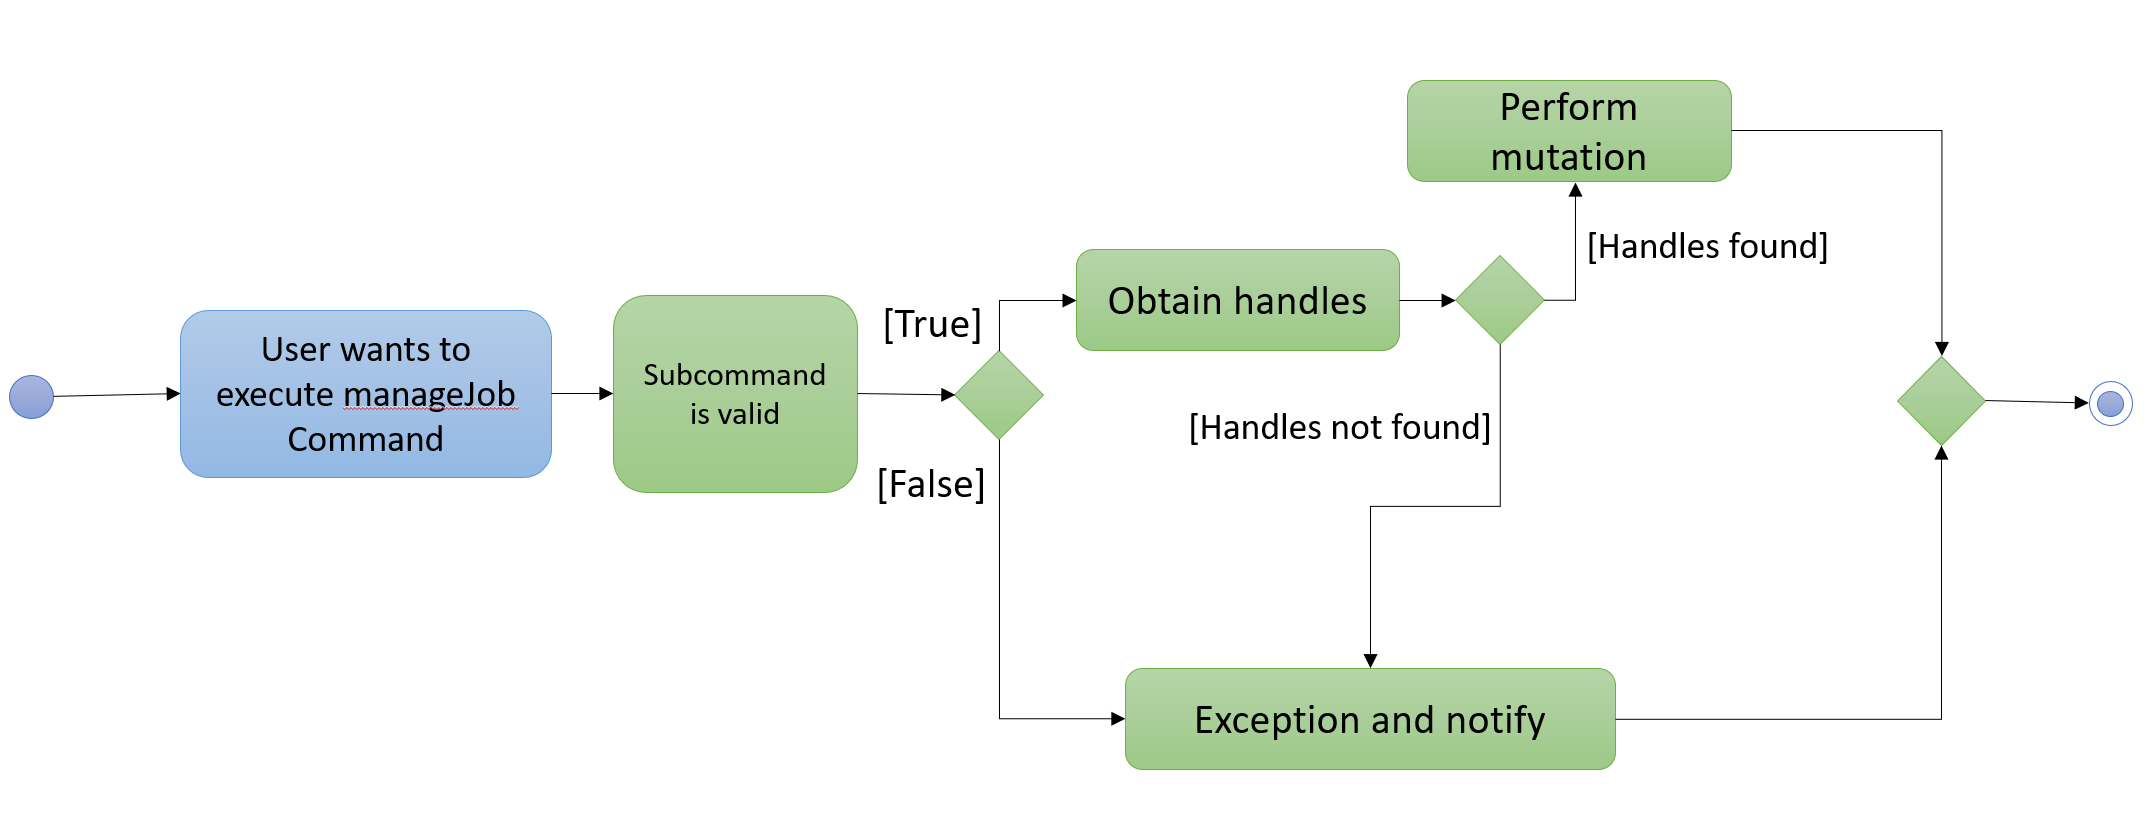
The generic flow of a typical manageJob command is as follows:
-
User enters a manageJob command
-
The method associated with its subcommand will be called.
-
Lookup methods findJob() / findMachine() will be called to obtain a handle on the target Job or Machine. If the these methods do not find the Job / Machine with the correct unique identifier (name), an Exception will be raised.
-
If the handles are found, then the appropriate action will be taken.
3.5.2. Design Considerations
Aspect: Direct Mutation of Objects (Jobs and Machines)
-
Alternative 1 (current choice): mutate object’s data fields directly.
-
Pros: No new objects have to be created, therefore saving unnecessary computations since only the required data fields are changed.
-
Cons: Objects are mutable. Additional care needs to be taken in ensuring that these objects are accessed defensively by methods that might cause unintended mutation. Additionally, mutation events must be flagged and raised, since they mutations within the Objects are not observed by its container.
-
-
Alternative 2: Create a new instance with edited fields
-
Pros: Defensive. Objects will never mutate, therefore there is no chance of unintended or illegal mutation. Changes observed by Observable Containers since a new object is created/added.
-
Cons: More computationally intensive, commands will take longer to execute. Also less room for extension since performance is now inversely proportional to object size.
-
3.6. Logging
We are using java.util.logging package for logging. The LogsCenter class is used to manage the logging levels and logging destinations.
-
The logging level can be controlled using the
logLevelsetting in the configuration file (See Section 3.7, “Configuration”) -
The
Loggerfor a class can be obtained usingLogsCenter.getLogger(Class)which will log messages according to the specified logging level -
Currently log messages are output through:
Consoleand to a.logfile.
Logging Levels
-
SEVERE: Critical problem detected which may possibly cause the termination of the application -
WARNING: Can continue, but with caution -
INFO: Information showing the noteworthy actions by the App -
FINE: Details that is not usually noteworthy but may be useful in debugging e.g. print the actual list instead of just its size
3.7. Configuration
Certain properties of the application can be controlled (e.g App name, logging level) through the configuration file (default: config.json).
4. Documentation
For any software, documentation is a must. In this project we maintain a developer guide and a user guide. The developer guide is mainly focused on letting people like you ease into development and maintenance of the software. The user guide is for clients trying to use the functionality we enable.
As you can see, documentation is non-trivial and of utmost importance. We write this section for encouraging good documentation practices, even in agile teams like ours.
We use asciidoc for writing documentation.
| We chose asciidoc over Markdown because asciidoc, although a bit more complex than Markdown, provides more flexibility in formatting. |
4.1. Editing Documentation
See UsingGradle.adoc to learn how to render .adoc files locally to preview the end result of your edits.
Alternatively, you can download the AsciiDoc plugin for IntelliJ, which allows you to preview the changes you have made to your .adoc files in real-time.
4.2. Publishing Documentation
See UsingTravis.adoc to learn how to deploy GitHub Pages using Travis.
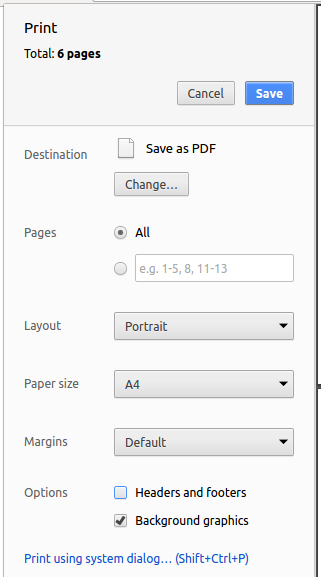
4.3. Converting Documentation to PDF format
We use Google Chrome for converting documentation to PDF format, as Chrome’s PDF engine preserves hyperlinks used in webpages.
Here are the steps to convert the project documentation files to PDF format.
-
Follow the instructions in UsingGradle.adoc to convert the AsciiDoc files in the
docs/directory to HTML format. -
Go to your generated HTML files in the
build/docsfolder, right click on them and selectOpen with→Google Chrome. -
Within Chrome, click on the
Printoption in Chrome’s menu. -
Set the destination to
Save as PDF, then clickSaveto save a copy of the file in PDF format. For best results, use the settings indicated in the screenshot below.
4.4. Site-wide Documentation Settings
The build.gradle file specifies some project-specific asciidoc attributes which affects how all documentation files within this project are rendered.
Attributes left unset in the build.gradle file will use their default value, if any.
|
| Attribute name | Description | Default value |
|---|---|---|
|
The name of the website. If set, the name will be displayed near the top of the page. |
not set |
|
URL to the site’s repository on GitHub. Setting this will add a "View on GitHub" link in the navigation bar. |
not set |
4.5. Per-file Documentation Settings
Each .adoc file may also specify some file-specific asciidoc attributes which affects how the file is rendered.
Asciidoctor’s built-in attributes may be specified and used as well.
Attributes left unset in .adoc files will use their default value, if any.
|
| Attribute name | Description | Default value |
|---|---|---|
|
Site section that the document belongs to.
This will cause the associated item in the navigation bar to be highlighted.
One of: |
not set |
|
Set this attribute to remove the site navigation bar. |
not set |
4.6. Site Template
The files in docs/stylesheets are the CSS stylesheets of the site.
You can modify them to change some properties of the site’s design.
The files in docs/templates controls the rendering of .adoc files into HTML5.
These template files are written in a mixture of Ruby and Slim.
|
Modifying the template files in |
5. Testing
Testing your program is an essential part of the development cycle. Testing ensures the correctness, functionality and usability of the app at every step of the way. This will help you catch regression bugs immediately and fix them with considerably much less hassle.
This section helps you discover, run and write tests for effective development.
5.1. Running Tests
There are three ways to run tests.
| The most reliable way to run tests is the 3rd one. The first two methods might fail some GUI tests due to platform/resolution-specific idiosyncrasies. |
Method 1: Using IntelliJ JUnit test runner
-
To run all tests, right-click on the
src/test/javafolder and chooseRun 'All Tests' -
To run a subset of tests, you can right-click on a test package, test class, or a test and choose
Run 'ABC'
Method 2: Using Gradle
-
Open a console and run the command
gradlew clean allTests(Mac/Linux:./gradlew clean allTests)
| See UsingGradle.adoc for more info on how to run tests using Gradle. |
Method 3: Using Gradle (headless)
Thanks to the TestFX library we use, our GUI tests can be run in the headless mode. In the headless mode, GUI tests do not show up on the screen. That means the developer can do other things on the Computer while the tests are running.
To run tests in headless mode, open a console and run the command gradlew clean headless allTests (Mac/Linux: ./gradlew clean headless allTests)
5.2. Types of tests
We have two types of tests:
-
GUI Tests - These are tests involving the GUI. They include,
-
System Tests that test the entire App by simulating user actions on the GUI. These are in the
systemtestspackage. -
Unit tests that test the individual components. These are in
seedu.address.uipackage.
-
-
Non-GUI Tests - These are tests not involving the GUI. They include,
-
Unit tests targeting the lowest level methods/classes.
e.g.seedu.address.commons.StringUtilTest -
Integration tests that are checking the integration of multiple code units (those code units are assumed to be working).
e.g.seedu.address.storage.StorageManagerTest -
Hybrids of unit and integration tests. These test are checking multiple code units as well as how the are connected together.
e.g.seedu.address.logic.LogicManagerTest
-
5.3. Troubleshooting Testing
Problem: HelpWindowTest fails with a NullPointerException.
-
Reason: One of its dependencies,
HelpWindow.htmlinsrc/main/resources/docsis missing. -
Solution: Execute Gradle task
processResources.
6. Dev Ops
This section will lay out the tools we used to make the development process easier and more fun. These tools were designed for efficient building, automated testing and deployment of releases in an agile team.
6.1. Build Automation
Build automation refers to the process of compiling, packaging and testing a piece of software automatically.
We use Gradle for this purpose. See UsingGradle.adoc to learn how to use Gradle for build automation.
6.2. Continuous Integration
Continuous Integration (CI) is the process of automating the build and testing of code every time someone commits to the repository. This is a best-practice in the industry, as it helps isolated team members coordinate development efforts without a big hassle.
We use Travis CI and AppVeyor to perform Continuous Integration on our projects. See UsingTravis.adoc and UsingAppVeyor.adoc for more details.
6.3. Coverage Reporting
Test coverage is a measure used to describe the degree to which the source code is executed when the test suite is executed. We use Coveralls to track the code coverage of our projects. See UsingCoveralls.adoc for more details.
6.4. Documentation Previews
When a pull request has changes to asciidoc files, you can use Netlify to see a preview of how the HTML version of those asciidoc files will look like when the pull request is merged. See UsingNetlify.adoc for more details.
6.5. Making a Release
You would want to make an official release of your application when there is a usable product, which is significantly more capable/better than the previous release, if any. Regular releases are also an essential component of any agile team. This section teaches you how to create a new release.
Here are the steps:
-
Update the version number in
MainApp.java. -
Generate a JAR file using Gradle.
-
Tag the repo with the version number. e.g.
v0.1 -
Create a new release using GitHub and upload the JAR file you created.
6.6. Managing Dependencies
A project often depends on third-party libraries. For example, MakerManager depends on the Jackson library for XML parsing. Managing these dependencies can be automated using Gradle. For example, Gradle can download the dependencies automatically, which is better than these alternatives:
-
Include those libraries in the repo (this bloats the repo size)
-
Require developers to download those libraries manually (this creates extra work for developers)
Appendix A: Product Scope
Target user profile: There will be two categories of users for the app. The main user will be students using the makerspace. The second user will be the lab manager.
-
has a need to manage a significant number shared devices (lab manager)
-
has a need to prioritize and queue certain print jobs over others (lab manager)
-
has a need to look up when certain devices will be free for use (students)
-
prefer desktop apps over other types
-
can type fast
-
prefers typing over mouse input
-
is reasonably comfortable using CLI apps
Value proposition: see 3D printers are being used, and the estimated time left until the equipment will be free. This will reduce system loss and increase the efficiency of all parties involved.
Appendix B: User Stories
Priorities: High (must have) - * , Medium (nice to have) - , Low (unlikely to have) - *
| *Priority * | As a… | I want to… | So that i can… | v1.4 |
|---|---|---|---|---|
** |
Student |
Have notifications informing me when my current printing job is almost complete |
Plan my schedule accordingly to collect my print. |
|
* |
Student |
Request deletion of my print job |
Cancel any printing job that has not been executed yet |
Y |
* |
User |
Add a print to a particular queue manually |
- |
Y |
** |
User |
Add a print automatically to any available devices |
Contribute towards optimizing the device usage |
|
* |
User |
Reset the time of a print if it fails halfway |
- |
Y |
* |
User |
Write a special note of print jobs, if any |
Avoid explaining changes in status to students |
Y |
* |
Lab Manager |
Cancel a print job |
- |
Y |
** |
Student |
Have suggestions provided by the system to schedule my print |
Properly plan my timetable accordingly to the suggestion |
|
** |
Student |
Upload the file to be printed |
Request printing job commencement by third party without being physically there |
|
** |
Student |
Be able to see the status of my current print job online |
Can plan on when to pick it up |
|
* |
Student |
Be able to send a print request to use a particular device at a certain time |
Collect an urgent print job earlier by choosing a fast printer. |
|
** |
Student |
Be able to see the status of the devices online from the comfort of my home |
See if any printers are currently available |
|
** |
Student |
Be able to confirm the collection time of my print job |
Can ensure that the print job is being executed according to schedule without any delays |
|
* |
Student |
Be able to request a higher priority of printing |
Get my emergency handled properly |
|
* |
Lab Manager |
Be able to control the queues for each device |
Streamline printing job requests, so that I can prioritize effectively |
Y |
* |
Lab Manager |
Be able to list out all my devices |
See the time remaining till they are free |
Y |
* |
Lab Manager |
Be able to list the devices available at the moment |
I can allocate the queue work well |
Y |
* |
User |
View the current queue for using a(set of) particular device |
Plan my schedule accordingly |
Y |
** |
Student |
Change my print request |
So that I can adjust according to my dynamic schedule. |
Y |
* |
User |
View print requests |
- |
Y |
** |
Lab Manager |
Add/Remove machines in the lab |
New queues are added/removed for/from use |
Y |
* |
User |
Start countdown of a print job |
Signal the start of a print |
Y |
* |
Lab Manager |
Request student to collect print |
Students are notified when prints are complete |
|
* |
Lab Manager |
View print history |
Keep an official record |
Y |
* |
User |
Change print status |
Change the status of a print |
Y |
* |
Lab Manager |
Change admin password |
Change admin password if needed |
Y |
** |
Lab Manager |
Add administrator |
Fulfill my job as lab manager by having access to admin-specific commands |
Y |
* |
Lab |
Logout of admin mode |
Prevent students from accessing admin mode |
Y |
* |
Users |
View sorted and filtered prints |
Easily see prints that are relevant to me |
Y |
* |
Lab Manager |
Change machine status |
Indicated nonfunctional/disabled machines |
Y |
* |
Lab Manager |
Login to Admin Mode |
Access admin functions |
Y |
Appendix C: Use Cases
In all cases, System refers to makerManager.
Actor: lab manager
Use case: reset the time remains if the printing job fails halfway
MSS:
-
User resets time after resetting devices
-
System updates queues
Actor: students
Use case: request to remove the printing job
MSS:
-
User sends the request to remove the printing job
-
System send notification to the admin User case ends.
Actor: lab manager
Use case: remove the printing job
MSS:
-
User sends command to remove a particular print job (by ID)
-
System removes the print job Extension:
1a. User enters invalid print job ID
1b. System shows error and returns to main menu
Actor: lab manager
Use case: add machines to the list
MSS:
-
User chooses to add a new printer
-
System asks for name and details
-
User provides name and details
-
System shows confirmation of addition User case ends.
Extension:
3a. User does not provide valid name and details
3b. System goes back to main menu.
Actor: Users
Use case: View Printing Queues
MSS:
-
Users execute the command to see the queues
-
System shows all the queues User case ends.
Extension:
2a. User can specify sorting and filtering based on attributes
2b. System shows list according to demands
Actor: Lab manager
Use case: manually change the status of machine
MSS:
-
User executes the command to change machine status
-
System updates the status of the machine. User case ends.
Actor: Lab manager
Use case: logout of admin mode
MSS:
-
User executes the command to exit the admin mode
-
System changes to normal user mode. Use case ends.
Actor: Lab manager, student
Use case: add administrator
MSS:
-
User executes the command to add the new administrator profile, along with details
-
System updates the new admin profile to storage User case ends.
Actor: Student, Lab Manager
Use case: see the printing job queue for a specific facility
MSS:
-
User specifies the facility (s)he wants to view
-
System list down all the running printing jobs in the particular queue Use case ends.
Actor: Lab manager
Use case: change the admin password
MSS:
-
User executes the command for changing the passwords
-
System pops out the window for user to input the new password
-
User enters the new password
-
System updates the user profile User case ends.
Actor: students
Use case: change the print request
MSS:
-
User executes command to change a certain print job (by ID)
-
System asks for the changes
-
User enters changes
-
System updates storage and queues to reflect changes User case ends.
Extension:
1a. User enters invalid print job ID
1b. System shows error and returns to main menu
Actor: Lab manager
Use case: view print requests
MSS:
-
User executes the command line
-
System list down all the current printing job User case ends.
Actor: lab manager
Use case: admin login
MSS:
-
User types in the username and password
-
System authenticates the user name and password
-
System shows the main menu or returns to the login page User case ends.
Extension: 2a. User entered wrong username or password
2b. System returns to the login page
Actor : Lab Manager
User case : Show history
MSS:
-
User types in command to show log
-
System gives the user a view of the log Use case ends.
Use case : Show printing progress notifications
Actor : Lab manager
MSS:
-
User execute commands to send the notification.
-
System generates the notification and sends to the printer’s phone. User case ends.
Actor: students, lab managers
Use Case: manually add a job
MSS:
-
user enters command to show all devices
-
System lists down devices
-
user requests to add a job to a specific machine in the list, specifies the estimated time left
-
system adds a job to the specific machine in the list. Use case ends.
User Case: Show device statuses
Actor: Lab Manager
MSS:
-
User enters command to show all devices
-
System lists down devices and shows time remaining till device is free next to the devices or the machine is not available for use. Use case ends.
Appendix D: Non Functional Requirements
-
Should work on any mainstream OS as long as it has Java 9 or higher installed.
-
Should be able to hold up to 1000 prints without a noticeable sluggishness in performance for typical usage.
-
A user with above average typing speed for regular English text (i.e. not code, not system admin commands) should be able to accomplish most of the tasks faster using commands than using the mouse.
Appendix F: Instructions for Manual Testing
Given below are instructions to test the app manually.
Testers are encouraged to follow the testing codes sequentially.
| These instructions only provide a starting point for testers to work on; testers are expected to do more exploratory testing. |
F.1. Launch and Shutdown
-
Initial launch
-
Download the jar file and copy into an empty folder
-
Download the data files by downloading the DemoDataV1.4.zip from the root.
-
Unzip and save the data files in a folder called 'data' in the same directoryin which you saved the jar file on your computer.
The 'data' file should contain the 3 files below.
data/addressBook.xml
data/makerManagerAdmins.xml
data/makerManagerMachines.xml
-
Double-click the jar file
Expected view:
Shows the GUI with a list of printers displayed horizontally where each column represents a printer with print jobs assigned to it.
These printers are already pre-added to the maker manager local database.
The window size may not be optimum.
-
-
Saving window preferences
-
Resize the window to an optimum size. Move the window to a different location. Close the window.
-
Re-launch the app by double-clicking the jar file.
Expected: The most recent window size and location is retained.
-
-
Leaving the app:
-
Enter the command:
exit
-
The window shall close automatically.
-
F.2. Ease of use
-
Test case: help window activation
help
Expected:
A pop-up window containing the user guide will be displayed.
F.3. Managing the admin access
-
Test case: login to a default admin account
login admin admin
Expected:
The command box will turn to be blue. Message "login success!" will be shown. Label "[ADMIN_MODE]" will be displayed at the bottom of the app.
Failing Variations: - Wrong password - Wrong username -
Test case: add an admin to the system (admin only)
addAdmin saif aaaAAA123$ aaaAAA123$
Expected:
Message "New admin added successfully!" will be shown.
Failing Variations: - Password too simple, and does not meet requirements -
Test case: add an admin which is already in the system, judged by username (admin only)
addAdmin saif aaaAAA123$ aaaAAA123$
Expected:
The command will not work because there is existing a user admin "saif". Message "This username already exists. Try a new one or login." will be shown.
-
Test case: Passwords don’t match when adding an admin (admin only)
addAdmin newAdmin aaaAAA123$ aaaAAA123
Expected:
The command will not work because the verification password (entered the second time) does not match first entry. Message "The two password fields don't match! Please try again." will be shown.
-
Test case: update password of logged in admin
updatePassword admin admin betterPassword123$ betterPassword123$
Expected: Message "Your password has been changed successfully!" shown.
Failing Variations: - trying to update password of "saif" when logged in as "admin". You can only update your own password - Wrong old password - Not adhering to password constraints given on top -
Test case: remove the currently logged in admin (logged in as "admin" only)
removeAdmin admin
Expected:
Message "Admin removed successfully!" will be shown, indicating the "admin" is already moved from the system.
The command box will turn back to black and the "[ADMIN_MODE]" label will disappear because "admin" is the currently logged in administrator. Removing the currently logged in administrator will log out that one automatically.
Failing Variations: - Admin to be removed not present in system - Admin to be removed is the last admin in the system. -
Test case: login to a admin account which is recently added
login saif aaaAAA123$
Expected:
The command box will turn to be blue. Message "login success!" will be shown. Label "[ADMIN_MODE]" will be displayed at the bottom of the app.
-
Test case: exit from the admin mode (admin only)
logout
Expected:
Message "Admin removed successfully!" will be shown, indicating the "saif" is already moved from the system.
The command box will turn back to black and the "[ADMIN_MODE]" label will disappear.
F.4. Adding a print Job to a machine
-
Test case: add a job called "spectacleframe" to machine "ultimaker"
addJob n/spectacleframe m/ultimaker on/Jimmy pr/NORMAL d/0.03 jn/For a Friend t/personal
Expected:
A print job named spectacleframe will be added to the column under ultimaker at the bottom of the queue.
-
Test case: add a job to the most free machine
addJob n/phonecase m/AUTO on/George pr/NORMAL d/0.1 jn/New phonecase for new phone t/personal
Expected:
A print job named phonecase will be added to the 'Most Free Machine' in the maker manager system
** Most free machine represents the machine with the least time until released.
-
Test case: add a job to a machine which does not exist in the machine list
addJob n/buildingmodel m/nosuchmachine on/Jerry pr/URGENT d/1 jn/for Final year project t/SchoolProject
Expected:
No job will be added to any machine. Error will be shown in result box as "Machine specified does not exist"
-
Test case: add a job to a disabled machine
addJob n/model m/ender on/Rakuten pr/NORMAL d/1.5 jn/for school project t/SchoolProject
Expected:
No job will be added to any machine. Error will be shown in result box as "Failed to add Job. Machine specified is Disabled"
-
Test case: add a job with invalid name
addJob n/!!!NAME!!! m/ender on/Rakuten pr/NORMAL d/1.5 jn/for school project t/SchoolProject
Expected:
No job will be added to any machine. Error will be shown in result box as "Job names should only contain alphanumeric characters and spaces, and it should not be blank"
-
Test case: add a job with invalid priority
addJob n/model m/ender on/Rakuten pr/FAKEPRIORITY d/1.5 jn/for school project t/SchoolProject
Expected:
No job will be added to any machine. Error will be shown in result box as "Job priority can only be URGENT, HIGH and NORMAL"
-
Test case: add a job with invalid duration
addJob n/model m/ender on/Rakuten pr/URGENT d/NotATime jn/for school project t/SchoolProject
Expected:
No job will be added to any machine. Error will be shown in result box as "Duration must be a non-zero unsigned number with optional decimal point lesser than or equal to 9999 rounded to the nearest 3 decimal places"
-
Test case: add a job with duration exceeding 9999 hours
addJob n/model m/ender on/Rakuten pr/URGENT d/9999.1 jn/for school project t/SchoolProject
Expected:
No job will be added to any machine. Error will be shown in result box as "Duration must be a non-zero unsigned number with optional decimal point lesser than or equal to 9999 rounded to the nearest 3 decimal places"
F.5. Managing jobs which have been added to machines
-
Test case: find job(s) by its naming keywords
findJob cup
Expected:
Only the job "cup" will be displayed in the UI.
findJob c up
Expected:
No jobs will be shown.
findJob stool cup gears
Expected:
3 jobs: "stool", "cup", "gears" will be displayed in the UI.
-
Test case: list all the jobs
listJobs
Expected:
All the jobs will be displayed in the UI.
-
Test case: make a job which has been added into a machine start printing
manageJob laptopstand start
Expected:
The status label of the laptopstand job will be changed to ONGOING. The timer will start as well.
-
Test case: make a job which has been added into a machine cancel printing
manageJob laptopstand cancel
Expected:
The status label of the laptopstand job will be changed to CANCELLED. The job card will be moved to the end of the machine's job queue.
-
Test case: request a job to be deleted
requestDeletion n/laptopstand
Expected:
The status label of the laptopstand job will be changed to DELETING.
-
Test case: swap 2 jobs from 2 different machines (admin only)
logout
manageJob stool swap batterycontainer
Expected:
No swapping operation is done. Error shown in the result box, with the message saying "Non admin user is not allowed to shift Jobs in Maker Manager".
login saif aaaAAA123$
manageJob stool swap batterycontainer
Expected:
The "batterycontainer" job in the ultimaker will be swapped with the "stool" job in the mbot.
login saif aaaAAA123$
manageJob stool swap batterycontainer
Expected:
The "batterycontainer" job in the ultimaker will be swapped with the "stool" job in the mbot.
-
Test case: move a specified job to a specified machine (admin only)
logout
manageJob stool move ultimaker
Expected:
No moving operation is done. Error shown in the result box, with the message saying "Non admin user is not allowed to move Jobs in Maker Manager".
login saif aaaAAA123$
manageJob stool move ultimaker
Expected:
The "stool" job will be added to the machine "ultimaker".
-
Test case: move up the place of a job card in the GUI (admin only)
logout
manageJob stool shift up
Expected:
No shifting operation is done. Error shown in the result box, with the message saying "Non admin user is not allowed to shift Jobs in Maker Manager".
login saif aaaAAA123$
manageJob stool shift up
Expected:
The "stool" job will interchange the place in the queue with the job card displayed above it.
-
Test case: delete a job from a machine’s printing queue (admin only)
logout
manageJob laptopstand delete
Expected;
No deleting operation is done. Error shown in the result box, with the message saying "Non admin user is not allowed to delete Jobs in Maker Manager".
login saif aaaAAA123$
manageJob laptopstand delete
Expected:
The "laptopstand" job will be removed from the job queue and no longer be visible.
F.6. Managing the configurations of machines
-
Test case: find machines by multiple name keywords
findMachine mbot ender
Expected:
Only the machine: "mbot" and "ender", along with their printing queue will be displayed in the UI.
findMachine m bot
Expected:
No machines will be displayed.
-
Test case: list all machines in the MakerManager system
listMachines
Expected:
All the machines with their printing queue will be displayed in the UI.
-
Test case: add a new machine to the MakerManager system (admin only)
logout
addMachine n/creality ms/ENABLED
Expected:
No cleaning operation is done. Error thrown in the result box, saying "Non admin user is not allowed to add a machine to maker manager".
login saif aaaAAA123$
addMachine n/creativity ms/ENABLED
Expected:
A new machine will be added to the MakerManager system. A new printing queue with no job added will be displayed in the UI.
-
Test case: change the status of a machine (admin only)
logout
editMachine ender ms/ENABLED
Expected:
The command will be rejected because machine cannot be added without logging in by admin. Message "Non-admin user is not allowed to edit a machine in maker manager" will be shown.
login saif aaaAAA123$ (if not in ADMIN MODE)
editMachine ender ms/ENABLED
Expected:
The status of machine "ender" will be changed to "ENABLED" and "Available".
-
Test case: remove finished and failed jobs in a machine (admin only)
logout
manageMachine oldupbox clean
Expected:
No cleaning operation is done. Error thrown in the result box, saying "Non admin user is not allowed to manage a machine from maker manager".
login saif aaaAAA123$
manageMachine oldupbox clean
Expected:
All the jobs will the "FINISHED" or "CANCELLED" status will be removed from the printing queue of the machine "oldupbox"
-
Test case: remove a machine with jobs in its printing queue (admin only)
logout
manageMachine oldupbox remove
Expected:
No removing operation is done. Error thrown in the result box, saying "Non admin user is not allowed to manage a machine from maker manager".
login saif aaaAAA123$
manageMachine oldupbox remove
Expected:
Nothing will change in the UI and a message "Machine still have jobs" will be displayed in the result box. Machines with jobs not finished cannot be simply removed.
-
Test case: delete all the jobs in a machine, regardless of their status (admin only)
logout
manageMachine oldupbox flush
Expected:
No flushing operation is done. Error thrown in the result box, saying "Non admin user is not allowed to manage a machine from maker manager".
login saif aaaAAA123$
manageMachine oldupbox flush
Expected:
A pop-up window will be displayed, saying "Are you sure you want to flush oldupbox?"
If clicking ok, all jobs in the machine "oldupbox" will be removed.
If clicking cancel, nothing will happen and app will return to the main menu.
-
Test case: moving all the unprocessed jobs in a machine to other jobs (admin only)
logout
manageMachine oldupbox flush AUTO
Expected:
No flushing operation is done. Error thrown in the result box, saying "Non admin user is not allowed to manage a machine from maker manager".
login saif aaaAAA123$
Expected:
Jobs will be shifted to other machines dependent on the total duration of the machine.
The first job will find the most free machine at that time and move to that machine.
The second job will find the most free machine after the first machine is moved and move itself to the most free machine.
...
-
Test case: removed a machine with an empty printing queue (admin only)
logout
manageMachine oldupbox remove
Expected:
No flushing operation is done. Error thrown in the result box, saying "Non admin user is not allowed to manage a machine from maker manager".
login saif aaaAAA123$
manageMachine oldupbox remove
Expected:
The machine "oldupbox" is removed from the machine list and the printing queue is no longer visible.
F.7. Operation traceability
-
Test case: undo the previous command (cannot undo the logout command)
addJob n/iDCP m/ultimaker on/TIAN YUAN pr/HIGH d/1.5 jn/This is for the iDCP project t/iDCP
undo
Expected:
After the first command is executed, the "iDCP"job will be added to the print queue of "ultimaker".
After the "undo" command is executed, the job "iDCP" will be removed from the print queue.
login saif aaaAAA123$
manageJob stool swap batterycontainer
undo
Expected:
The "batterycontainer" job in the ultimaker and the "stool" job in the mbot will be swapped after the "managaJob swap" is done and will be swapped back after "undo" is done.
login saif aaaAAA123$
logout
undo
Expected:
The admin "saif" will be logged in and logged out.
While "undoing", error will be thrown in the result box, saying "Access Denied. Unable to undo Logout."
-
Test case: redo the previous undone command (cannot redo the login command)
addJob n/iDCP m/ultimaker on/TIAN YUAN pr/HIGH d/1.5 jn/This is for the iDCP project t/iDCP
undo
Expected:
After the first command is executed, the "iDCP"job will be added to the print queue of "ultimaker".
After the "undo" command is executed, the job "iDCP" will be removed from the print queue.
After the "redo" command is executed, the job "iDCP" will be added back to the print queue.
login saif aaaAAA123$
manageJob stool swap batterycontainer
undo
redo
Expected:
The "batterycontainer" job in the ultimaker will be swapped with the "stool" job in the mbot.
login saif aaaAAA123$
undo
redo
Expected:
After the "undo" command, the MakerManger will be logged out from the admin mode.
While "redoing" the login command, errors will be thrown in the result box, saying "Access denied. Please Re-Login manually."